
We can send messages to our loved ones and communicate with people over the internet due to the TCP/IP model. The data we send over the internet needs to be accurate and get to the intended person on time and still intact. This is possible due to the TCP/IP model, where data is first broken down into packets and sent over the internet. Once it reaches its intended target, it is reassembled back and sent across to the client. In this post, I will explain how to build a simple TCP/IP connection. Then, we will test it using python’s built-in testing module unit test and the python testing framework called pytest.
What is a TCP/IP connection?
Transmission Control Protocol/Internet Protocol is known by the acronym TCP/IP. It is a collection of guidelines and procedures used to connect network devices over the Internet. It is a data communication protocol that allows computers and devices to send and receive data.
A client or machine (a client) receives a benefit (such as the sending of a webpage) from another computer (a server) on the network when using TCP/client-server IP's communication model.
The TCP/IP suite of standards is categorized as stateless as a whole, implying that every client request is thought of as being unique because it has no bearing on earlier ones. Being stateless frees up network paths, allowing for ongoing use.
How does a TCP/IP connection work?
We'll start by talking about how to send a packet over a TCP/IP port.
1. The first step is to establish a relationship/connection
When two computers want to send data over TCP, they must first establish a connection with a three-way handshake.
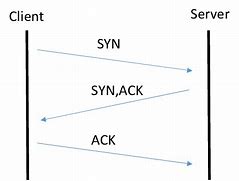
The SYN bit is set to (SYN = "synchronize?") when the first machine transmits a packet. The second computer responds by sending a message with the ACK bit set to (ACK = "acknowledge!") and the SYN bit set to. The first computer responds with an ACK.
In fact, the three packets that make up the three-way handshake often contain no data. The computers are prepared to receive packets containing actual data once the handshake is complete.
2. In the following step, we send data packets
The recipient is always required to acknowledge receipt of a data packet sent over TCP. The first computer delivers a packet containing data and a sequence number. In order to acknowledge it, the second computer sets the ACK bit and increases the acknowledgement number by the size of the data it has received.
Sequence and acknowledgement numbers are contained in the TCP header as shown below:
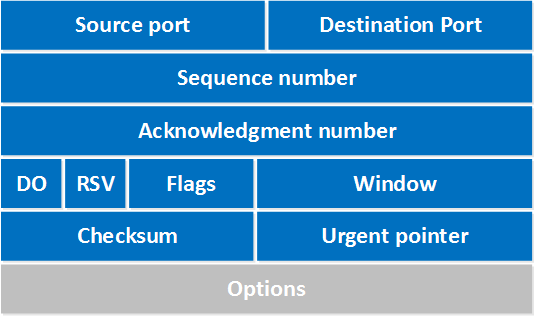
When the ACK bit is set to 1, it indicates that acknowledgement number contained in the TCP header is valid.
The computers can keep track of which data was successfully received, which data was deleted, and which data was unintentionally sent twice with the use of those two numbers (the sequence number and the acknowledgement number)
3. We then disconnect the connection
In order to stop sending or receiving data, either computer can stop the connection.
By transmitting a packet with the FIN bit set to 1 (FIN = finish), a computer can start the process of cutting the connection. The response from the other computer is an ACK and another FIN. After one more ACK from the initiating computer, the connection is closed.
How to build the server side?
I believe that at this point we should have gotten to understand that a server refers to software that accepts requests made over a network. Different types of servers exist:
- DNS server (TCP, UDP)
- email server
- file server
- web server (commonly used in applications, using GET, POST, etc requests)
- database server
- web proxy server, etc.
In this example, we would be building a simple TCP/IP connection and testing to ensure that all requests made to the server are received.
We start by first importing the necessary modules by running the following commands:
import socket
import threading
Next, we specify the node and port number we want our server to be listening for requests
host = "0.0.0.0"
port= 5000
Then we proceed to create a server connection by binding the host to a given port:
host = "0.0.0.0"
port= 5000
server = socket.socket(socket.AF_INET, socket.SOCK_STREAM)
server.bind((host, port))
server.listen(5)
The server. listen(5) simply means that our server can only listen to 5 requests at a time. We proceed to write a function that would be responsible for handling all clients that are sending the SYN to the server. Once we receive such requests, we send ACK back to the client and close the connection to start listening to a new request which explains the fact that requests made are stateless.
def handle_client(client_socket):
# show the data from the client
request = client_socket.recv(1024)
print "[*] Received: %s" % request
# Return a packet
client_socket.send("ACK")
client_socket.close()
Next, we write a code telling our server that while a client is still connected to this server, continue listening to requests and sending out the adequate response. It is usually recommended to make a multithreaded server because as the requests get a lot, the response time slows down if our server isn’t threaded.
while True:
client, addr = server.accept()
print "[*] Accepted connection from: %s:%d" % (addr[0], addr[1])
# activate the function to handle the data from client
client_handler = threading.Thread(target = handle_client, args=(client,))
client_handler.start()
The whole code together:
import socket
import threading
host = "0.0.0.0"
port= 5000
server = socket.socket(socket.AF_INET, socket.SOCK_STREAM)
server.bind((host, port))
server.listen(5)
print "[*] Listening on %s:%d" % (host, port)
# This is the thread we handle the data from the client
def handle_client(client_socket):
# show the data from the client
request = client_socket.recv(1024)
print "[*] Received: %s" % request
# Return a packet
client_socket.send("ACK")
client_socket.close()
while True:
client, addr = server.accept()
print "[*] Accepted connection from: %s:%d" % (addr[0], addr[1])
# activate the function to handle the data from client
client_handler = threading.Thread(target = handle_client, args=(client,))
client_handler.start()
How to build the client side?
A client simply refers to computers and systems that make requests over a server.
We start by first importing the necessary libraries.
import socket
Creating the necessary socket connection: Please note that to be able to connect to the server, you need to access the host IP address and the particular port the server is listening on.
host= "0.0.0.0"
port = 5000
# create a socket connection
client = socket.socket(socket.AF_INET, socket.SOCK_STREAM)
Then we connect to the server:
client.connect((host, port))
Send some requests to the server:
client.send("SYN")
Get a response and print it out:
response = client.recv(1024)
print response
Compiling the whole code together:
import socket
host= "0.0.0.0"
port = 5000
# create a socket connection
client = socket.socket(socket.AF_INET, socket.SOCK_STREAM)
# let the client connect
client.connect((host, port))
# send some data
client.send("SYN")
# get some data
response = client.recv(1024)
print response
To ensure that our application is running as expected and not raising any error, we can manually test it. For the above code, that’s easier as we do not have a lot of functions to test. However, if this had been running into lines of code, the task would have become tedious. In such a situation we would have to use testing frameworks such as pytest, unittest, etc to automate the process which we would be doing in the later part of this article.
On your windows search bar, type in cmd and open the windows command prompt. Navigate to the folder where your client and server files are located, for instance: C:/Users/Sarima Chiorlu/Documents/Demo/server.py.
When located in the directory where my file is stored, you can run the following command:
py server.py
My server should be running now and be able to receive connections from a client system. Then you run:
py client.py
If all is done correctly, your client should be able to start listening to connections. Now that we are done coding out our tcp/ip port, we can now test our application. However, before starting any tests, let’s first understand why it is advisable to test our application.
Why is testing important?
Testing is one of the most important aspects of the software development process. We all make mistakes, and while some of these mistakes may not be critical, or may not raise any red flags, some others do. These mistakes can cost a lot, some others might result in the decline of an organization. Hence, we have to test everything to ensure it produces the expected result.
What is a unit test?
It is easier to create and execute tests for your Python code with the aid of the Unit test standard library.
Unit tests can help you uncover flaws in your programs and avoid regressions from happening when your code changes over time. In general, test-driven development teams may find unit tests valuable in ensuring that all authored code has a corresponding set of tests.
In this article, we will use Python's unit test module to create a test that guarantees that all successful server connections produce the required results.
Testing the port with unit test
At the earlier stage of this article, we were told that we could automate the process of checking that a connection was made. We would be looking at how we can do that now. To begin, we have to first import the unit test module and to import the socket module.
import unittest
import socket
class Test_ServerResponse(unittest.TestCase):
# Setup client connection
def setUp(self):
self.s = socket.socket(socket.AF_INET, socket.SOCK_STREAM)
self.s.connect((‘0.0.0.0’, self.port))
def test_1(self):
self.s.send('hello'.encode())
self.assertEqual(self.s.recv(1024).decode(), 'hello')
if __name__ == '__main__':
unittest.main()
In the above code, we can see that besides importing all the necessary modules, we had to set up the connection. We took a snippet from the client which can be seen in the setup function and proceeded to check to see that the response: “hello” we get is the same as the data that a possible client would send to our server.
Generally, using the unit test module in python is easier for simple test cases. However, in the case of multiple functions, it becomes tedious to use. Hence, we use the pytest framework which has a richer set of inbuilt functions and requires using less code to get the same output.
Conclusion
This article explained how to create a basic server-client connection in Python and how to test that connection using both the built-in "unit test" testing module and the pytest testing library. We were able to go through networking fundamentals and the significance of testing.
.png)
.jpeg)


