
Customers who have already received us for a presentation on their premises know this: the Agilitest capture tool is an essential component of the solution which makes it possible to select the UI elements to be captured and to re-use in tests as as action targets. Detailed presentation of this tool for the ergonomics of the automation engineer, and the robustness of the tests!
What is the capture tool?
During the course of a manual test or an automated test, it is essential to define the target of each action programmed in the scenario. For example, a "click" type action requires a target element on which to interact so that the test clicks on the right button, or the right interface element.
It is the Agilitest capture tool - also called a locator - that allows you to define these action targets. It allows you to go far in identifying the components of your applications, to set up tailor-made detection rules with the relevant attributes.
In practice, the capture tool allows you to fly over the graphical interface elements of your web, mobile, desktop applications, or data structures (XML for your SOAP webservices, JSON for your REST webservices).
For each element so flown over, the capture tool presents the tree structure in which it is located, and the attributes it possesses.
It is the same capture tool that allows you to capture HTML tags from the DOM of your web applications, Widgets from your desktop or mobile applications, or even a graphical presentation of the data structures of your webservices.
The Agilitest capture tool is graphic, versatile, and dedicated the the mulitchannel tests creations.
Locator opening
The Agilitest capture tool should not be run blank from the start of the software, because the latter requires opening the application on which you want to run it. Logically, to capture an element, you need an application on which to capture!
To start, you need to create a project, then create a new ATS Script component. Then you need to create a channel opening action, such as a Chrome browser channel. You can execute this first action with the button to the right of the line.
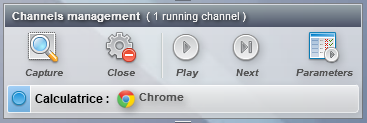
After opening the channel, you can finally open the capture tool with the "Capture" icon in the form of a magnifying glass which is located in the banner at the bottom right of Agilitest.
Using the locator
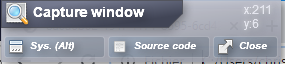
The Agilitest capture tool is composed of a "Capture window". Its first button allows you to switch between the HTML capture mode (for web apps) and the system capture mode for desktop elements. At the top right of this window, you find the x, y coordinates of the cursor which can be useful for defining eccentric clicks relative to the targeted element.
The mouse over each element of your application is accompanied by a tooltip specifying its type (either the name of the HTML tag for the web, or the name of the GUI component for the desktop).
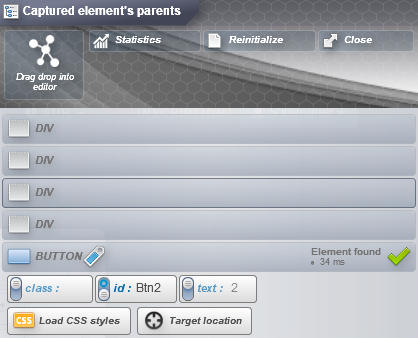
The Ctrl key is used to capture the element overflown. There comes the second window "Parents of the captured element" which displays the captured element (at the bottom) and which traces all its parents to the root of the application. These parents unfold in an accordion, and we can check the attributes that we want to retain to perform the detection of the element. These attributes are of type class, id, name, or even CSS attributes for web applications. Or, they can be of the TitleBar, Button, TabItem type for desktop applications.

Finally, the "Drag and drop in editor" icon allows you to use this detection rule in the element in an Agilitest action. You can drag and drop either after the last lines of the test (Create action tooltip) or inside an action line in the "Interface element" part.
Advanced locator features
Captured item statistics
On the "Parents of the captured element" window, the Statistics button allows you to check whether the checked attributes allow the element to be recognized uniquely on the page.
Depending on the structure of the application, it may be normal to recognize several items from the same detection rule (for example several menu items) and we can then specify in Agilitest which one to retain by its index number.
But in general, it is better to identify the elements in a unique way, and to use ids for this when possible.
Regular expressions (regex)
Regular expressions can be used in the Agilitest capture tool to match parts of attributes.
For example, some Javascript libraries are known to randomize certain parts of ids or classes. We then observe ids of the type "btn-XYhSj02-01". We can guess that the first part "btn" is fixed and that the second part "01" also, only the central part is likely to vary.
We can then match this id with a regular expression of type :
btn -. {7} -01
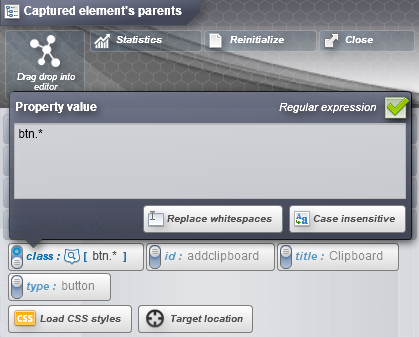
The use of regular expressions brings an additional layer of difficulty, but their use makes it possible to deal simply with the most delicate cases. The difficulty associated with regular expressions is therefore a lesser evil.
Graphic recognition of elements
Graphic recognition is possible with Agilitest, it can detect the presence of an element on the application and count the number of occurrences. If it is not advisable to abandon the capture system by HTML attributes, graphic recognition is complementary in very specific use cases.
For example, when the desired element has no usable ID or class, graphic recognition can be used. And still, even on the applications with the least attributes, there are tricks.
When the application includes an inclusion of Java, Flash, or 3D code, the capture tool will not always be able to dive into the application tree to present the various interface elements in a structured manner. In this case, the graphical recognition allows you to perform actions or controls even in the presence of programming framework not very cooperative with Agilitest. Read more on graphic recognition.
Why we developed such a tool
Simplicity first
Agilitest is a product that aims to be simple and usable by a functional validation team not expert in software development.
Consequently, anything that calls for a technical background in development, or that is too difficult for a non-expert is excluded.
For the development of this tool, the KISS principle naturally applied to offer a simple and efficient tool.
Agilitest vs. Locator tools for developers
Some web developers may wonder about the interest of the Agilitest capture tool compared to the developer tool panel offered by browsers with the F12 key.
The question does not arise long as the Agilitest capture tool is at a higher level:
- the Agilitest capture tool is multi-browser: Chrome, Firefox, IE, Edge, Opera are treated identically;
- the Agilitest capture tool is multi-channel and usable on: web applications, webservices, desktop applications, mobile applications;
- the Agilitest capture tool is not limited to flying over the elements, it allows fine-tuning of the detection rules and testing their uniqueness on the application screen;
- the Agilitest capture tool offers graphical recognition in addition to recognizing HTML attributes.
Agilitest vs. Locator XPaths
Many software applications use XPath as a system for detecting elements in an application.
Detection is often assisted, and allows relative ease in the creation of an XPath expression. The latter is therefore created and used, very often without the automation engineer or the functional tester having had the opportunity to reread and revise it in the light of their knowledge of the application.
And to tell the truth ... it is often better like that as the automatically generated XPath expressions can be cumbersome to read by a human being. And when the application evolves during an update, these XPath expressions often break, causing a knockout test and a need for maintenance ... until the next update of the application! This is especially true with Javascript frameworks (like ExtJS) which randomize element ids making their use difficult.
In our opinion, there are two reasons for not using XPath technology in Agilitest:
- No XPath expressions generated automatically without revision of the automation engineer or functional tester
- No systematic KO test after updating the application.
Finally, the Agilitest capture tool seems simpler and more pleasant to use.
If you are a convinced XPath user, do not hesitate to share your feedback with us.
Conclusion
And now you know everything about the Agilitest capture tool, from how it works to how it compares with other tools in the sector.
If we had to summarize the main strengths of this locator, it would be its simplicity for the user regardless of the technology used, and the robustness of the tests achieved through its use.
.png)


