Actions menu
The Agilitest action menu is central and allows you to manually declare all possible actions in a test script.
Open an ATS script to have access to the actions menu.

Some of these actions can act directly on a component and can be created from an element captured and dropped into the script.
These actions are: Check actions, Mouse actions, Enter text, Property, Javascript and Select actions.
Types of actions
.png)
Channels action
These actions allow you to start, switch and close a channel of your test. They are integrated directly into the script.
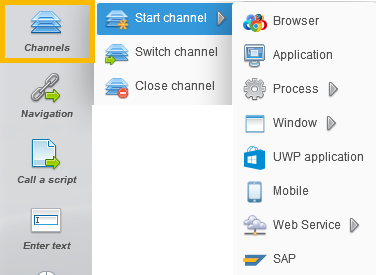
Start channel: This action allows Agilitest to make the link with the application under test.
Switch channel: This action is used when several channels are present in the script. It allows to switch between the different channels.
Close channel: This tells Agilitest that the channel will no longer be used during this test and will close the application.
📖 Channels management documentation.
.png)
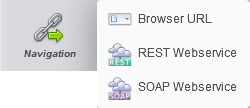
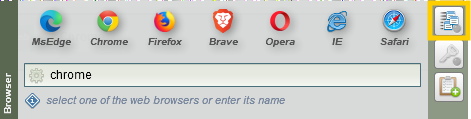
Navigation actions
In the case of application automation on remote services, Web and Webservices, these actions will allow you to indicate which URL to navigate to and which protocol to select: Web / HTTP, SOAP, REST.
🔸 Warning
In the case of an execution on the desktop, you will still have to go through the "Browser URL" action by entering the path of the tested application in the Windows Explorer.
📖 Web automation documentation.
.png)
Subscript action
Sub-scripts do not differ from scripts, both are ATS files, only one is called by the other.
There are two ways to use this action:
- By making a direct call with or without parameters
- From a CSV/JSON file
📖 Subscript parameters documentation.
.png)
Enter text action
The enter text action sends items corresponding to keyboard keys to your application, key presses, with or without additional special keys.
This action is inserted directly into your script. From the action you can set the nature of the action.
Click on the action "Enter text [ ]" to enter a text.
.png)
You can write directly the desired text with your keyboard. You also have access to the special keys which have the same functions as those present on the keyboard (enter, space, CTRL, etc...).
.png)
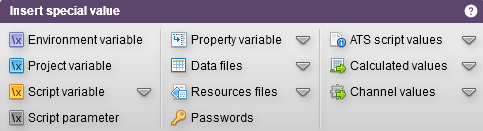
Also, you can insert special values into your text entry from the special value menu.

This will give you access to various values, variables, etc…
📖 Text input documentation.
.png)
Mouse actions
The mouse actions are used to manage the mouse on PC applications, but also the specific actions of mobile applications such as the swipe.
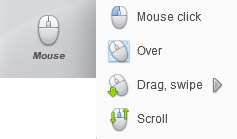
This action contains multiple mouse actions:
- Mouse click: It performs a click action on an element
- Over: It simulates the mouse over
- Drag and Drop: This action contains a sub-menu that completes it:
- Drag: This performs a hold click
- Drop: This releases the element. It must be preceded by a "drag" action
- Swip: To swipe right, left, up or down with the mouse or by simulating touch for web tests.
- Scroll: To scroll a cursor or access elements of a page
📖 Mouse actions documentation.
.png)
Check actions
Check actions are generated for an explicit check or assertion during the test. This can potentially lead to the test failing or allowing it to continue.
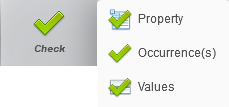
There are three possible verification actions:
- Property check: This allows you to check the value of an existing property in the script
.png)
- Occurrences check: This allows you to check the number of occurrences of an element
.png)
- Values check: This allows to verify that a value corresponds to an existing value in the script
.png)
📖 Checks documentation.
.png)
Property action
The property action allows you, from a captured component, to retrieve one of its properties and place it in a variable.
This variable can then be used to define other dependent variables, create assertions, etc.
.png)
It is possible to recover a CSS or HTML property.

.png)
System actions
System actions are only used for a mobile channel.
This action is done in two ways:
- By using the button action: This allows you to interact with a physical button on the phone (sound setting, home, lock, etc...)
- By setting the properties: This allows you to define a system property (sound volume level, phone orientation, enable/disable WIFI, etc...)
.png)
Window actions
The window management action allows you to manage the Windows operating system, Windows desktop modal applications and browser tabs.
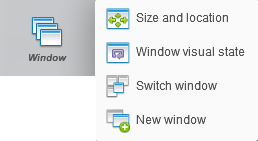
The window action has a sub-menu with three possible actions:
- Size and location: This moves the window by specifying its new Cartesian coordinates or to change its size (height and width).
- Window visual state: This allows you to send an event from the operating system to the current window.
- Switch Window: This changes the current window by specifying the number of the window that should be swapped.
- New window: to add a window to your current Window
It does not allow you to manage the internal windows of some web applications, which are floating HTML elements, directly accessible with the web automations.
A specific action is also available to manage dialog boxes without adding unnecessary complexity.
📖 Windows management documentation.
.png)
Select action
Agilitest supports HTML SELECT components and combo boxes for Desktop applications. These components have a graphical interface and a particular behavior: they select one or more values from a drop-down list.
You have 3 options of selection:
- index
- text
- value
📖 Select and combo boxes documentation.
.png)
Scripting action
Scripting is used to execute Javascript code on a component.
It differs from the Java execution action which occurs outside the context of a component (but which can still retrieve variables).
📖 Scripting documentation.

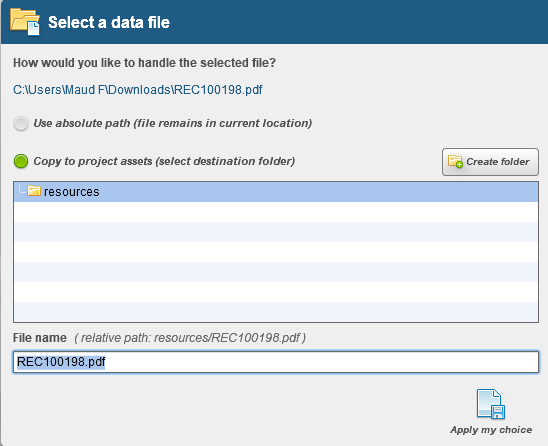
File transfer action
The file transfer action allows you to either upload a file from your machine to your application or download a file from your application to your machine.
For both the download and the upload action, you will need to select an absolute path from your machine to your application.
You can also copy the file into the project and thus create a relative path to the file in the project's resource directory.
📖 File transfer documentation.

Network capture action
The network activity action lets you capture network traffic while an ATS test is running.
There is one prerequisite for enabling network activity capture which is to activate the recorder button in the start channel action.
📖 Network capture documentation.
.png)
Comment actions
In addition to simple technical comments, this action will allow you to declare key functional steps in your test.
.png)
This action has four types of comments:
- Functional step: This comment indicates an important step in the script
- Script comment: This comment explains the operations performed by the script
- Execution log: This comment is functional on strings
- Report Summary: Allows you to add text to the summary of the generated execution report
📖 Comments and logs documentation.
