Launching tests from an Azure DevOps pipeline
There are many ways to run ATS tests on Azure DevOps, here's a short overview of the solution we have implemented, which might give you some tips and tricks to implement yours.
To operate, Azure Pipeline relies on two types of agents:
- Microsoft hosted: Agents are hosted on Microsoft Cloud and many platforms are offered. For more information: https://docs.microsoft.com/en-us/azure/devops/pipelines/agents/hosted?view=azure-devops
- Self hosted: You can download the agent installer and host it yourself on the environment of your choice. For more information: https://docs.microsoft.com/en-us/azure/devops/pipelines/agents/agents?view=azure-devops&tabs=browser#installWe use self-hosted agents and this is the solution that will be described in this article. However, it is certainly possible to adapt the information below if you wish to use agents hosted on the Microsoft Cloud.
1. Setting up the environment
You can install the Azure Pipeline agent on a Linux, MacOS, Windows or Docker machine. In this article we will detail the steps to use an agent on a Windows 10 machine. You can refer to the Microsoft documentation for the specifics of other platforms.
How to download and install the agent
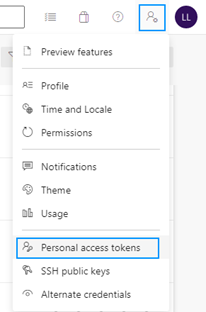
To start, log in to Azure DevOps and click on ”User settings” and then on ”Personal access tokens”:
Follow the next steps:
- Create a new token by selecting the Agent Pools (read, manage) permission
- Return to the Azure DevOps home page and click on Organization settings at the bottom left.
- Click on Agent Pools and select the Default pool or create a new Self hosted one.
- Click on New Agent and follow the instructions on the page to upload your agent.
- Unzip the downloaded archive on the machine where you want to install the agent and run config.cmd.
- Follow the script to set up your agent, including the token created earlier. When you have the choice between an interactive mode or as a service, choose the interactive mode otherwise you will not be able to launch the ATS tests.
- Once your agent is configured, run run.cmd to start it.
- For more information about how to download and install an Azure Pipeline agent: https://docs.microsoft.com/en-us/azure/devops/pipelines/agents/v2-windows?view=azure-devops
-
Machine setup
Once the agent is installed, several elements are necessary for the proper functioning of the ATS tests:
- The .actiontestscript folder: this folder must be present at the root of the user's folder that will run the agent. It is created automatically and updated when Agilitest is launched. If you do not wish to install Agilitest on the machine where the agent is installed, you can copy and paste this folder from another computer where Agilitest is installed. In the future it will be possible to update this folder via npm and to automated it in the pipeline.
- The JDK must be installed. Currently Agilitest needs JDK version 11 or higher.
- Maven must also be installed, you can download it here: https://maven.apache.org/download.cgi
2. Creating a new pipeline on Azure DevOps
On Azure DevOps click on the “Pipelines” menu

Then click on "New pipeline" and indicate where your Agilitest project code is located
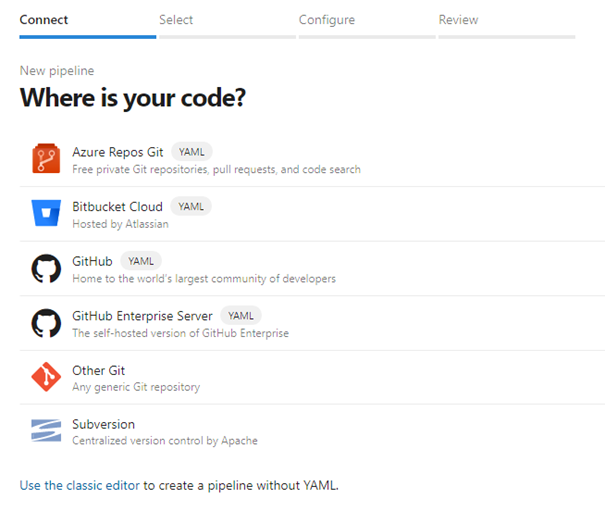
Follow the instructions to connect the Azure pipeline.
You can choose to use a preconfigured pipeline for Maven.

The selection of a maven project will allow AzuredevOps to directly manage the dependencies and external required libraries.
- You can also start from an empty pipeline and add a Maven task.
- In the pool section, change the "vmImage" type to "name" and enter the name of the pool you created earlier.
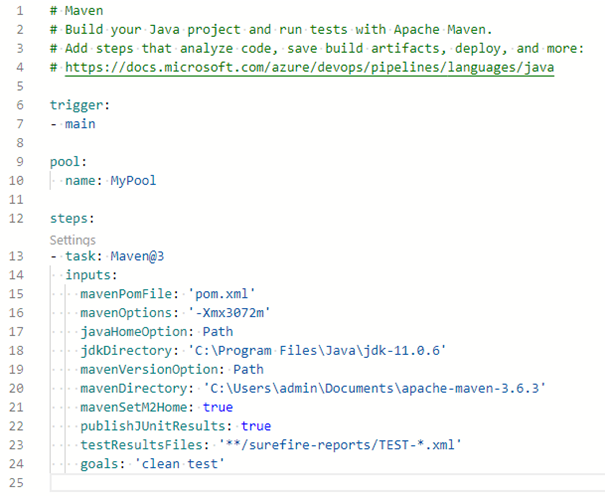
Modify the Maven task:
- Change the value of "goals" to "clean test"
- Change the value of "javaHomeOption" to "Path"
- Add a "jdkDirectory" property and specify the path to the JDK on your machineo Remove the "jdkVersionOption" and "jdkArchitectureOption" properties
- Add a "mavenVersionOption" property with the value "Path"
- Add a "mavenDirectory" property and specify the path of Maven on your machine
- Add a "mavenSetM2Home" property with the value "true"
Your YAML file should look like this:
For more information on the Maven task: https://docs.microsoft.com/en-us/azure/devops/pipelines/tasks/build/maven?view=azure-devops
If you click on Save and run, the YAML file will be added to your source code and your tests will be run according to the configuration in your pom.xml file.
