ATSMobileStation allows to perform tests on mobile (USB and Wifi) and on tablet (USB) through ATS or directly through Agilitest.
🔸Warning
Before continuing this documentation on the use of Mobile Station with Agilitest, make sure you have installed all the prerequisites by consulting the Mobile Station documentation on Gitlab: https://gitlab.com/actiontestscript/mobile/mobile-station#android-testing
To run Agilitest mobile tests on Apple platforms, your development Mac, Xcode, and target iOS/iPadOS versions must be mutually compatible. More information her : https://developer.apple.com/support/xcode/
Download links:
MacOS: https://actiontestscript.org/mobile.php?dl=macos
Windows: https://actiontestscript.org/mobile.php?dl=windows
You can also find these up to date links in the “Help” menu in Agilitest.
Configure a ATSMobileStation server
How to configure a MobileStation in order for Agilitest to discuss directly with MobileStation?
Find a video showing the steps to connect a Mobile Station server to Agilitest by watching this tutorial: https://youtu.be/-SE1kN03LMw (configure a Mobile Station server)
Connection to a server
To connect to a server, you must go to the Agilitest settings by clicking on "Settings" at the top right of the screen.
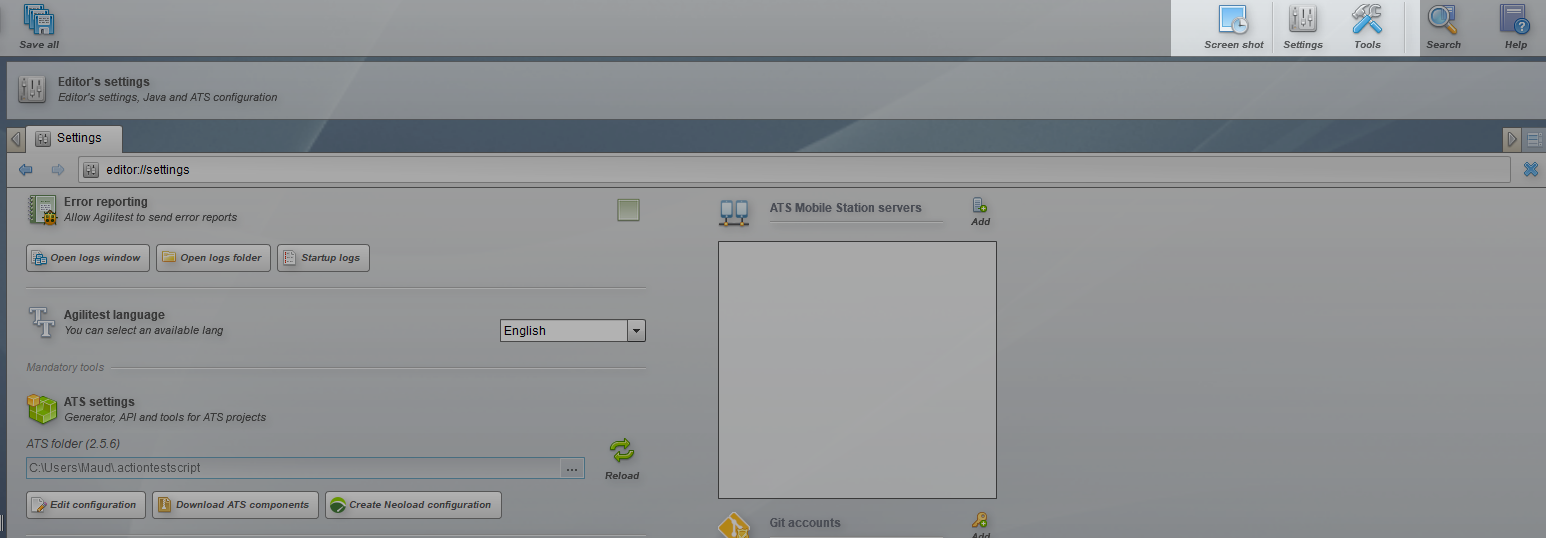
In the "ATS Mobile Station server" box, you can add a server that you will connect to Agilitest by clicking on the "Add" button
.png)
You will be asked to enter the IP address and port, which will be retrieved directly from the Mobile Station interface.

Press the "Enter" button to confirm your selection and the server will appear in a new line within the Mobile Station insert.
Click on the server to display the details and to be able to change the IP address and port.
.png)
Connect Agilitest to a mobile
There is a connection between Mobile Station and Agilitest, which allows Agilitest to know which devices (including IOS/Android tablets) are connected to Mobile Station.
Once the Mobile Station server is configured, open a new channel.
.png)
Then, select "Mobile application" in the choice of applications (phone icon in the upper right corner)
.png)
Agilitest will open a pop-up to enter the phone's IP address and port. You can enter this manually, or select a server connected to Mobile Station, like the one shown above.
Enter the phone's IP address or select a server.
.png)
Click on the "Discover" button to open the mobile window and its applications.
.png)
This will display the applications installed in the phone as well as a set of information accompanied by a visual of a phone that is not necessarily representative of its real appearance but is intended to differentiate an Android from an iOS.
From the list of applications on the phone, select the one you want to test, then click "Ok".
.png)
Once you have done this, you will be able to see that the channel has been modified with the new information, then click on the run button to open the application.
.png)
Requirements to connect an Android
For Android, you need to set up your mobile in developer mode.
Check the Gitlab documentation to configure your device beforehand:
https://gitlab.com/actiontestscript/mobile/mobile-station#android-testing
Go to the "Help" menu, at the top right of the editor
.png)
Click on the “ATSMobileStation” link corresponding to your OS (Windows or MacOS)
.png)
Execute the downloaded package to install this mobile device detection module locally.
Mobile Station unique use
On the MobileStation side, you will see a lock appear next to the mobile in which actions are executed. That means that this mobile is linked to this computer using Agilitest, so if another person who is using Agilitest on another computer wants to use this mobile a error message will appear to inform that the phone is already used.
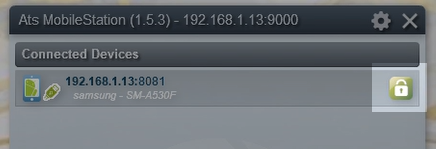
To free the phone et stop its utilisation in Agilitest, you simply have to close the channel of your script.
Mobile Station execution
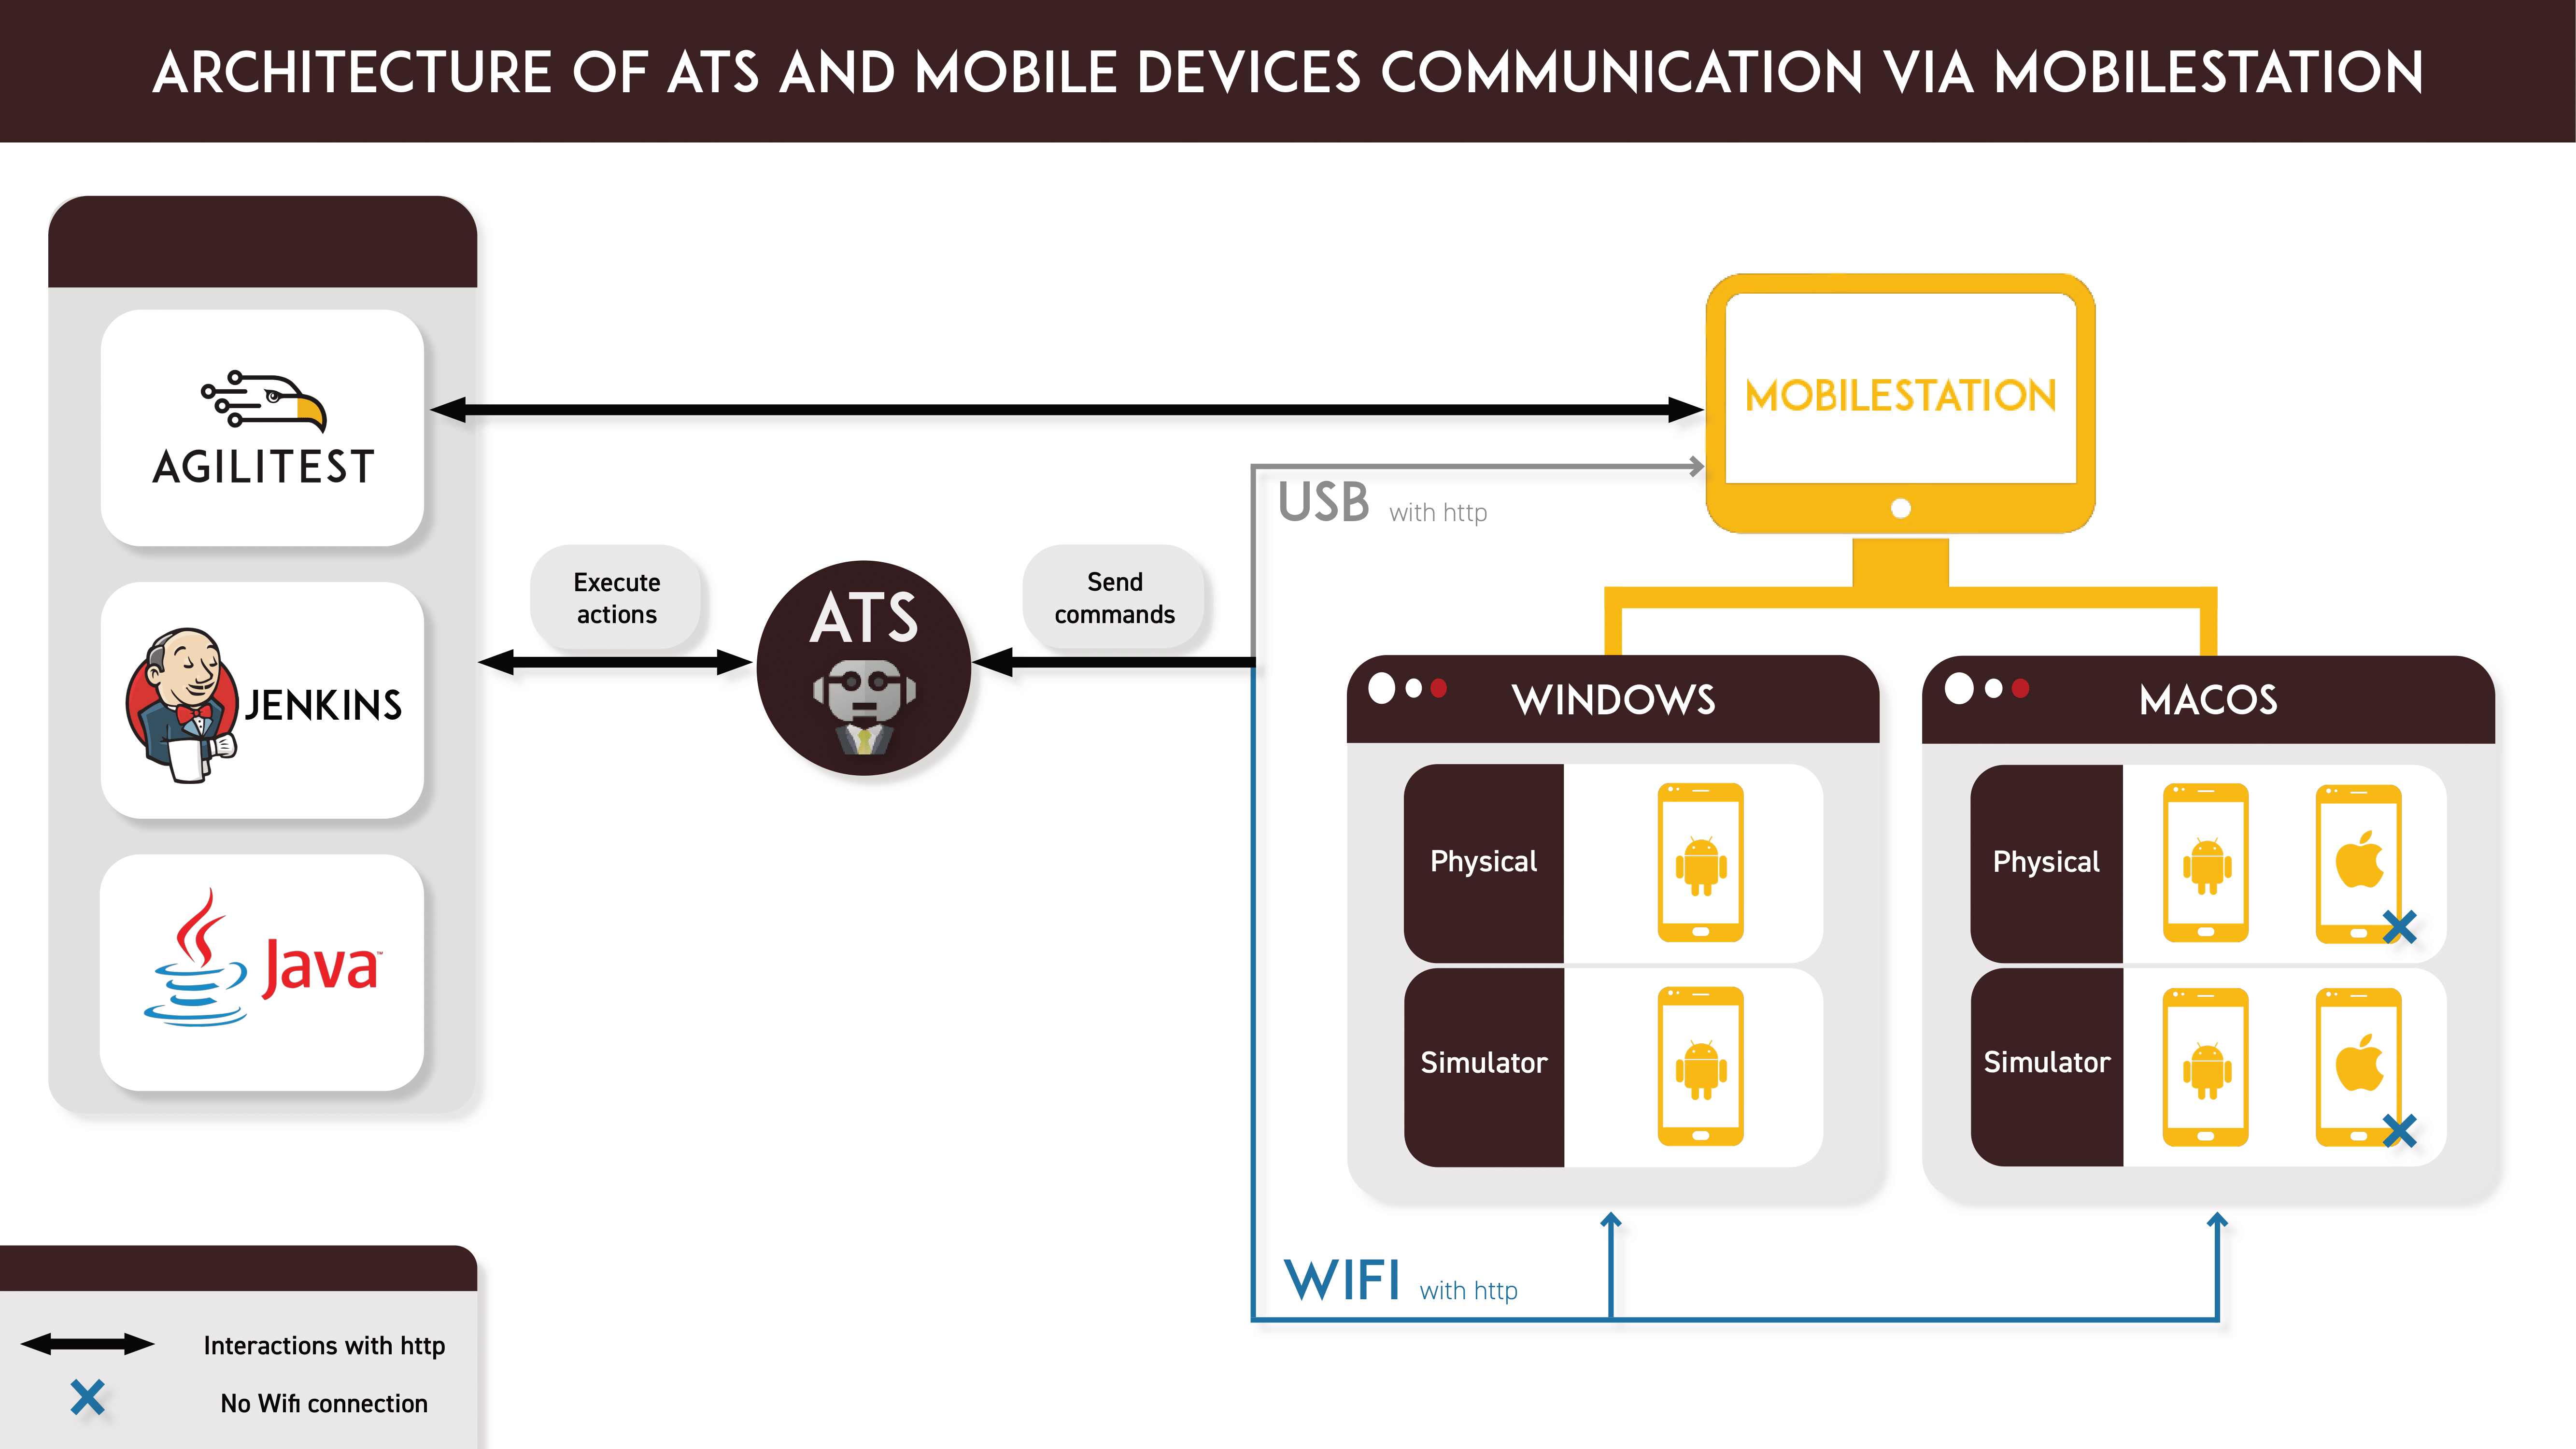
Mobile Station allows you to run tests on mobile devices and tablets through ATS or directly through Agilitest. The tests can be done on Windows, where only Android can be executed, or on MAC where it is possible to execute both Android and iOS. There are two ways to connect to mobile devices:
- By Wifi connection, except for iOS devices and tablets.
- By USB connection
Here is a scheme showing the execution system with Mobile Station:
Open a mobile application
Here is an example of a mobile test executed on a MAC. Agilitest is open with an already filled in script and Mobilestation is working with a plugged in Iphone.
The test procedure follows the same principles as a Web test.
Firts, open a channel,
.png)
When you want to use the capture tool, a visual rendering of your phone will open on your screen.
.png)
Capture of an element
To capture an element, the system is the same as for other forms of testing (web, desktop, etc...).
Then press the CTRL key on your keyboard to open the parent window of the captured element and the attributes.
.png)
With the capture open, it is also possible to interact directly on the elements of the application by pressing the Shift key on your keyboard.
Special buttons in Mobile Station
Mobile tests are very similar to tests done on other applications. However, two buttons are specific to Mobilestation:
- “Home” button
It appears in the center at the bottom of the phone’s visual. It serves as the home button you find on physical phones. By clicking on it the home page of the phone will appear.
.png)
- “Refresh” button
It appears at the top of the phone’s visual. This button is to reset the capture if it encounters any problems. It is used to reinforce the update.
.png)
Save parameters
You can save a setting to launch the mobile application you want in your ATS settings.
Click on the "Settings" button in the top right-hand corner.

Click on the "Edit configuration" button to open the .atsProperties file in your default text editor.

Then you can add your parameters in the configuration file by naming the application and adding the URL of the concerned application.
Example :
<mobiles><mobile><name>Betclic</name>
<url>mobile://192.168.0.39:8080/sport.android.betclic.fr</url>
<waitAction>100</waitAction></mobile></mobiles>
.png)
Mobile Station and continuous integration
Continuous integration allows the deployment of a mobile application developed externally to Mobile Station through an API Rest.

The application is sent to Mobile Station using a Rest API. Mobile Station then installs it on the devices so that the application can be run and tested with an ATS script through USB or WiFi.
There are three different strategies for implementing continuous integration:
Strategies for implementing continuous integration
- The tester's continuous integration launches the application developer's continuous integration
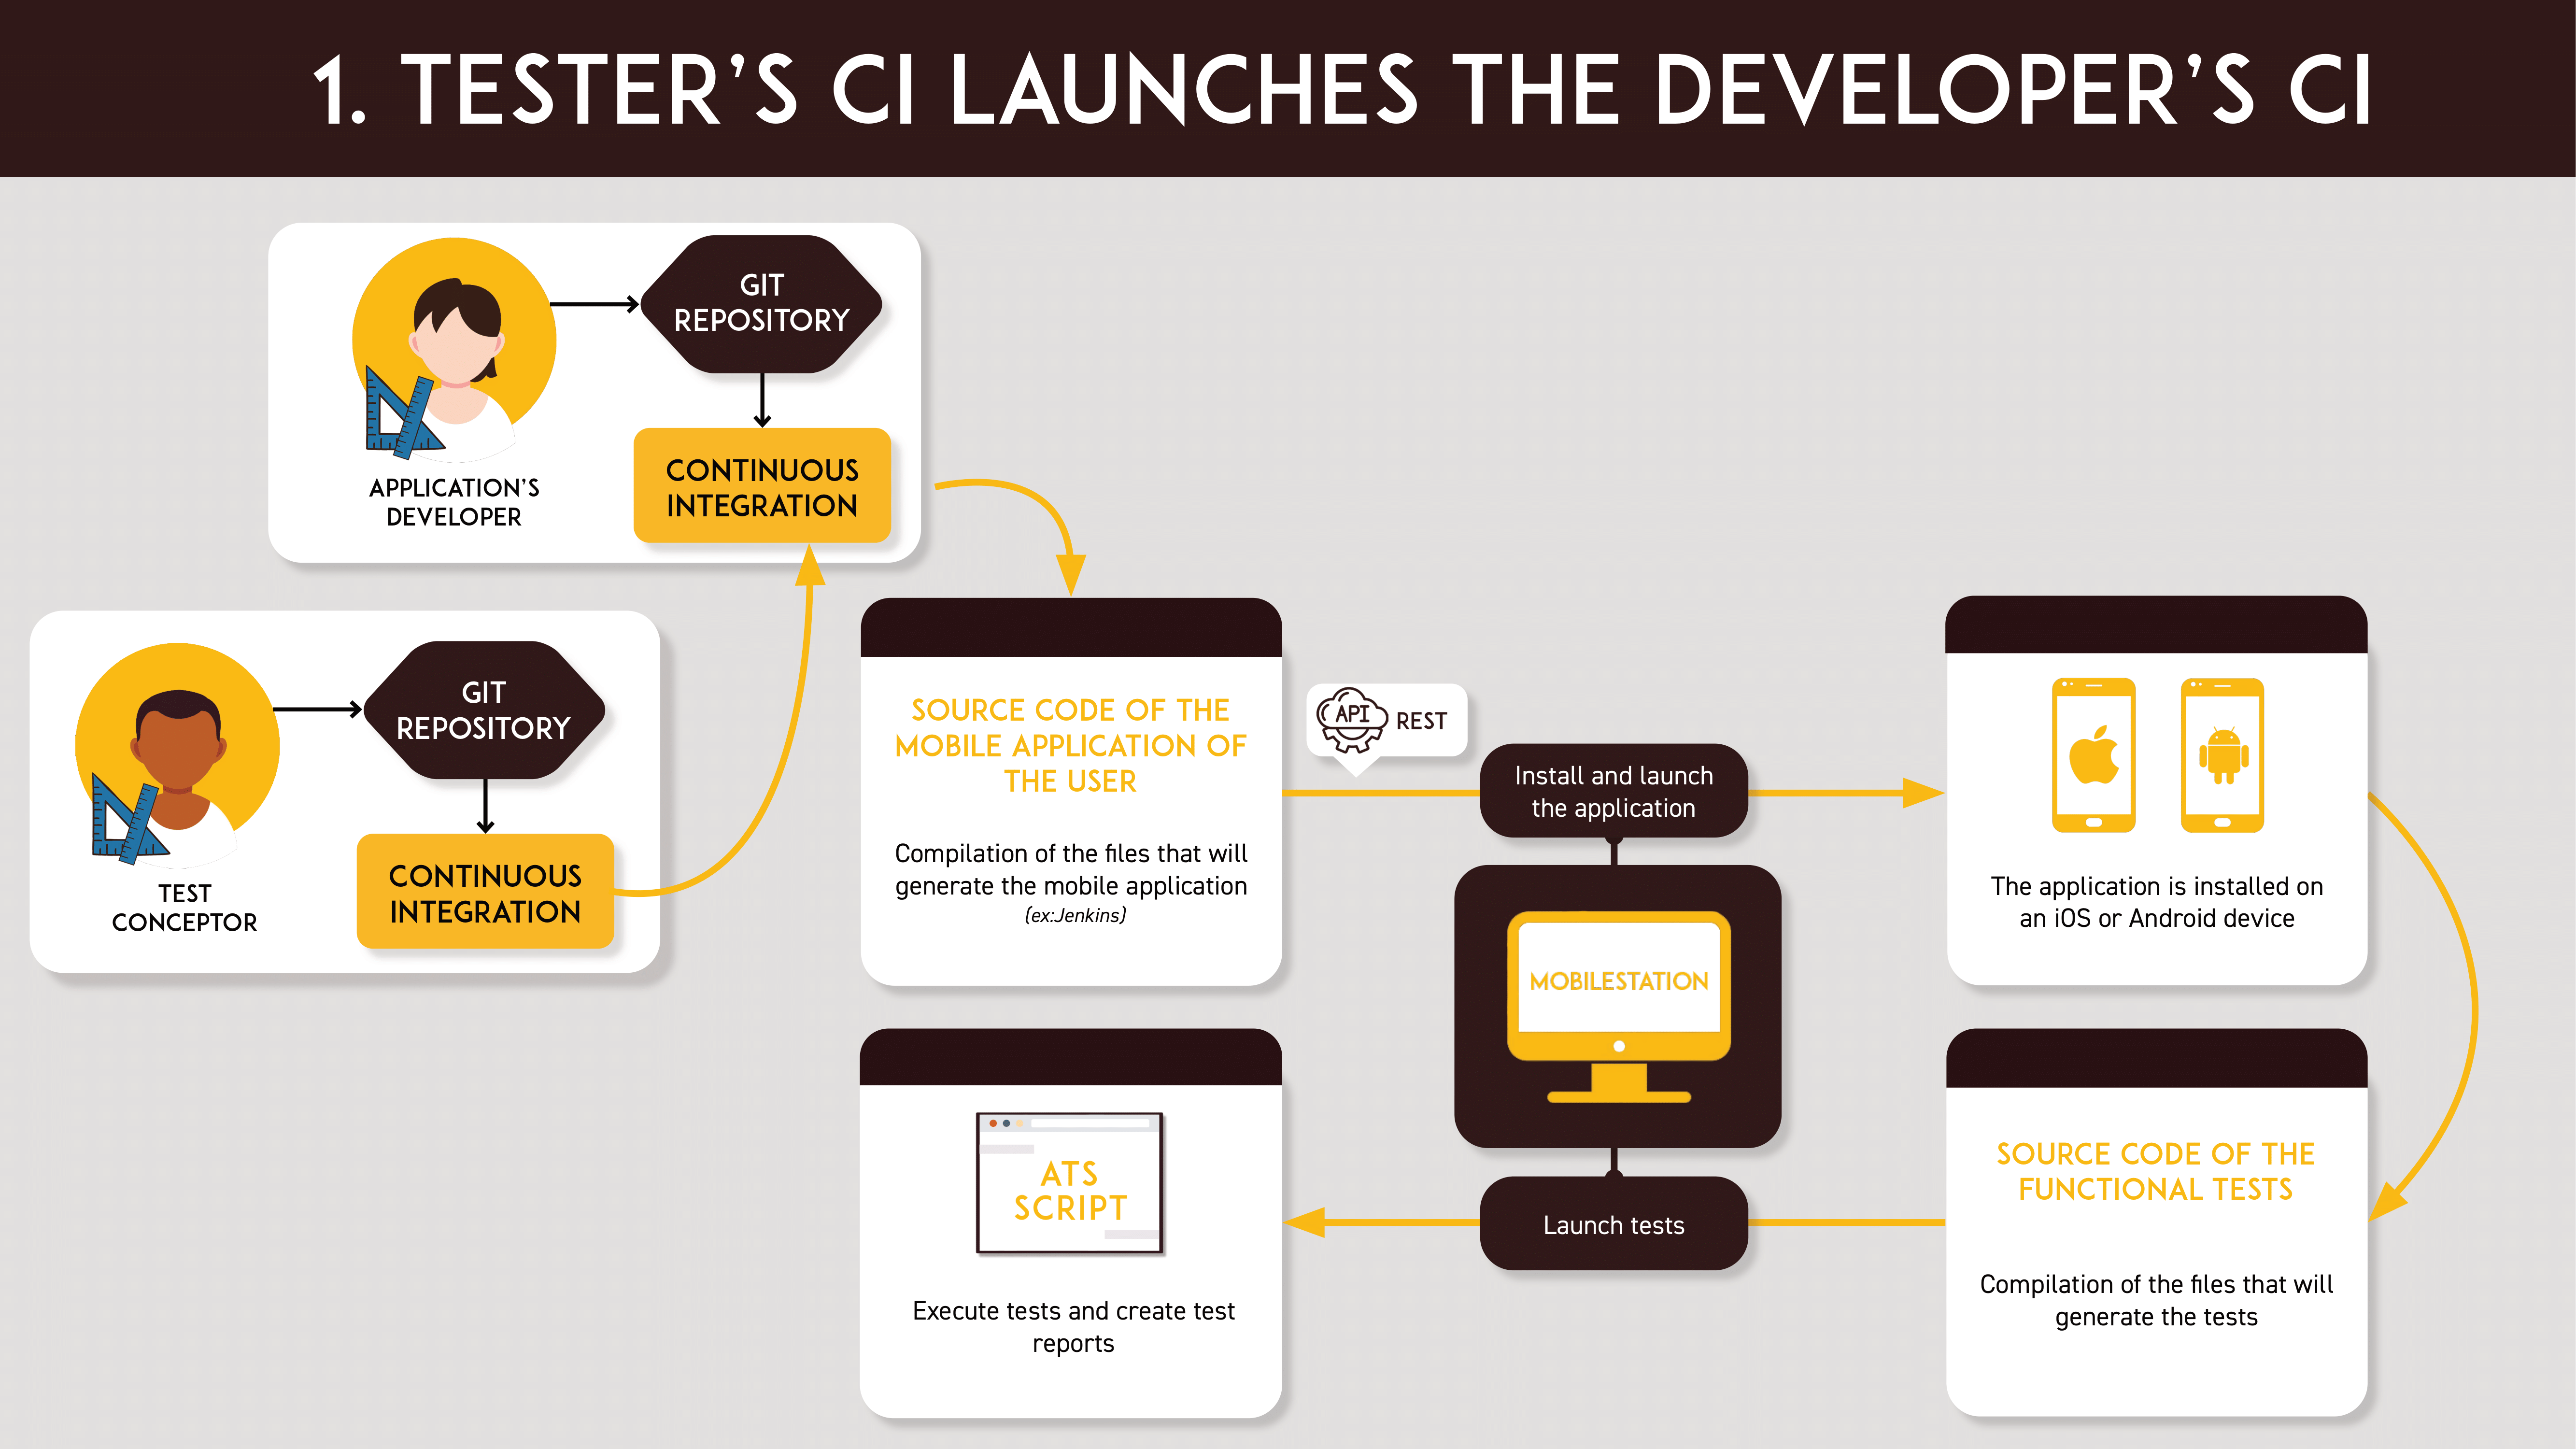
With its continuous integration, the test designer triggers the continuous integration of the application developer who will generate an application from the source code. This application will be sent to Mobile Station who will install it on the devices to make it available for testing. (Link to the video of the animated scheme: https://youtu.be/ISN874CZxxI)
2. The continuous integration of the application developer launches the continuous integration of the tester
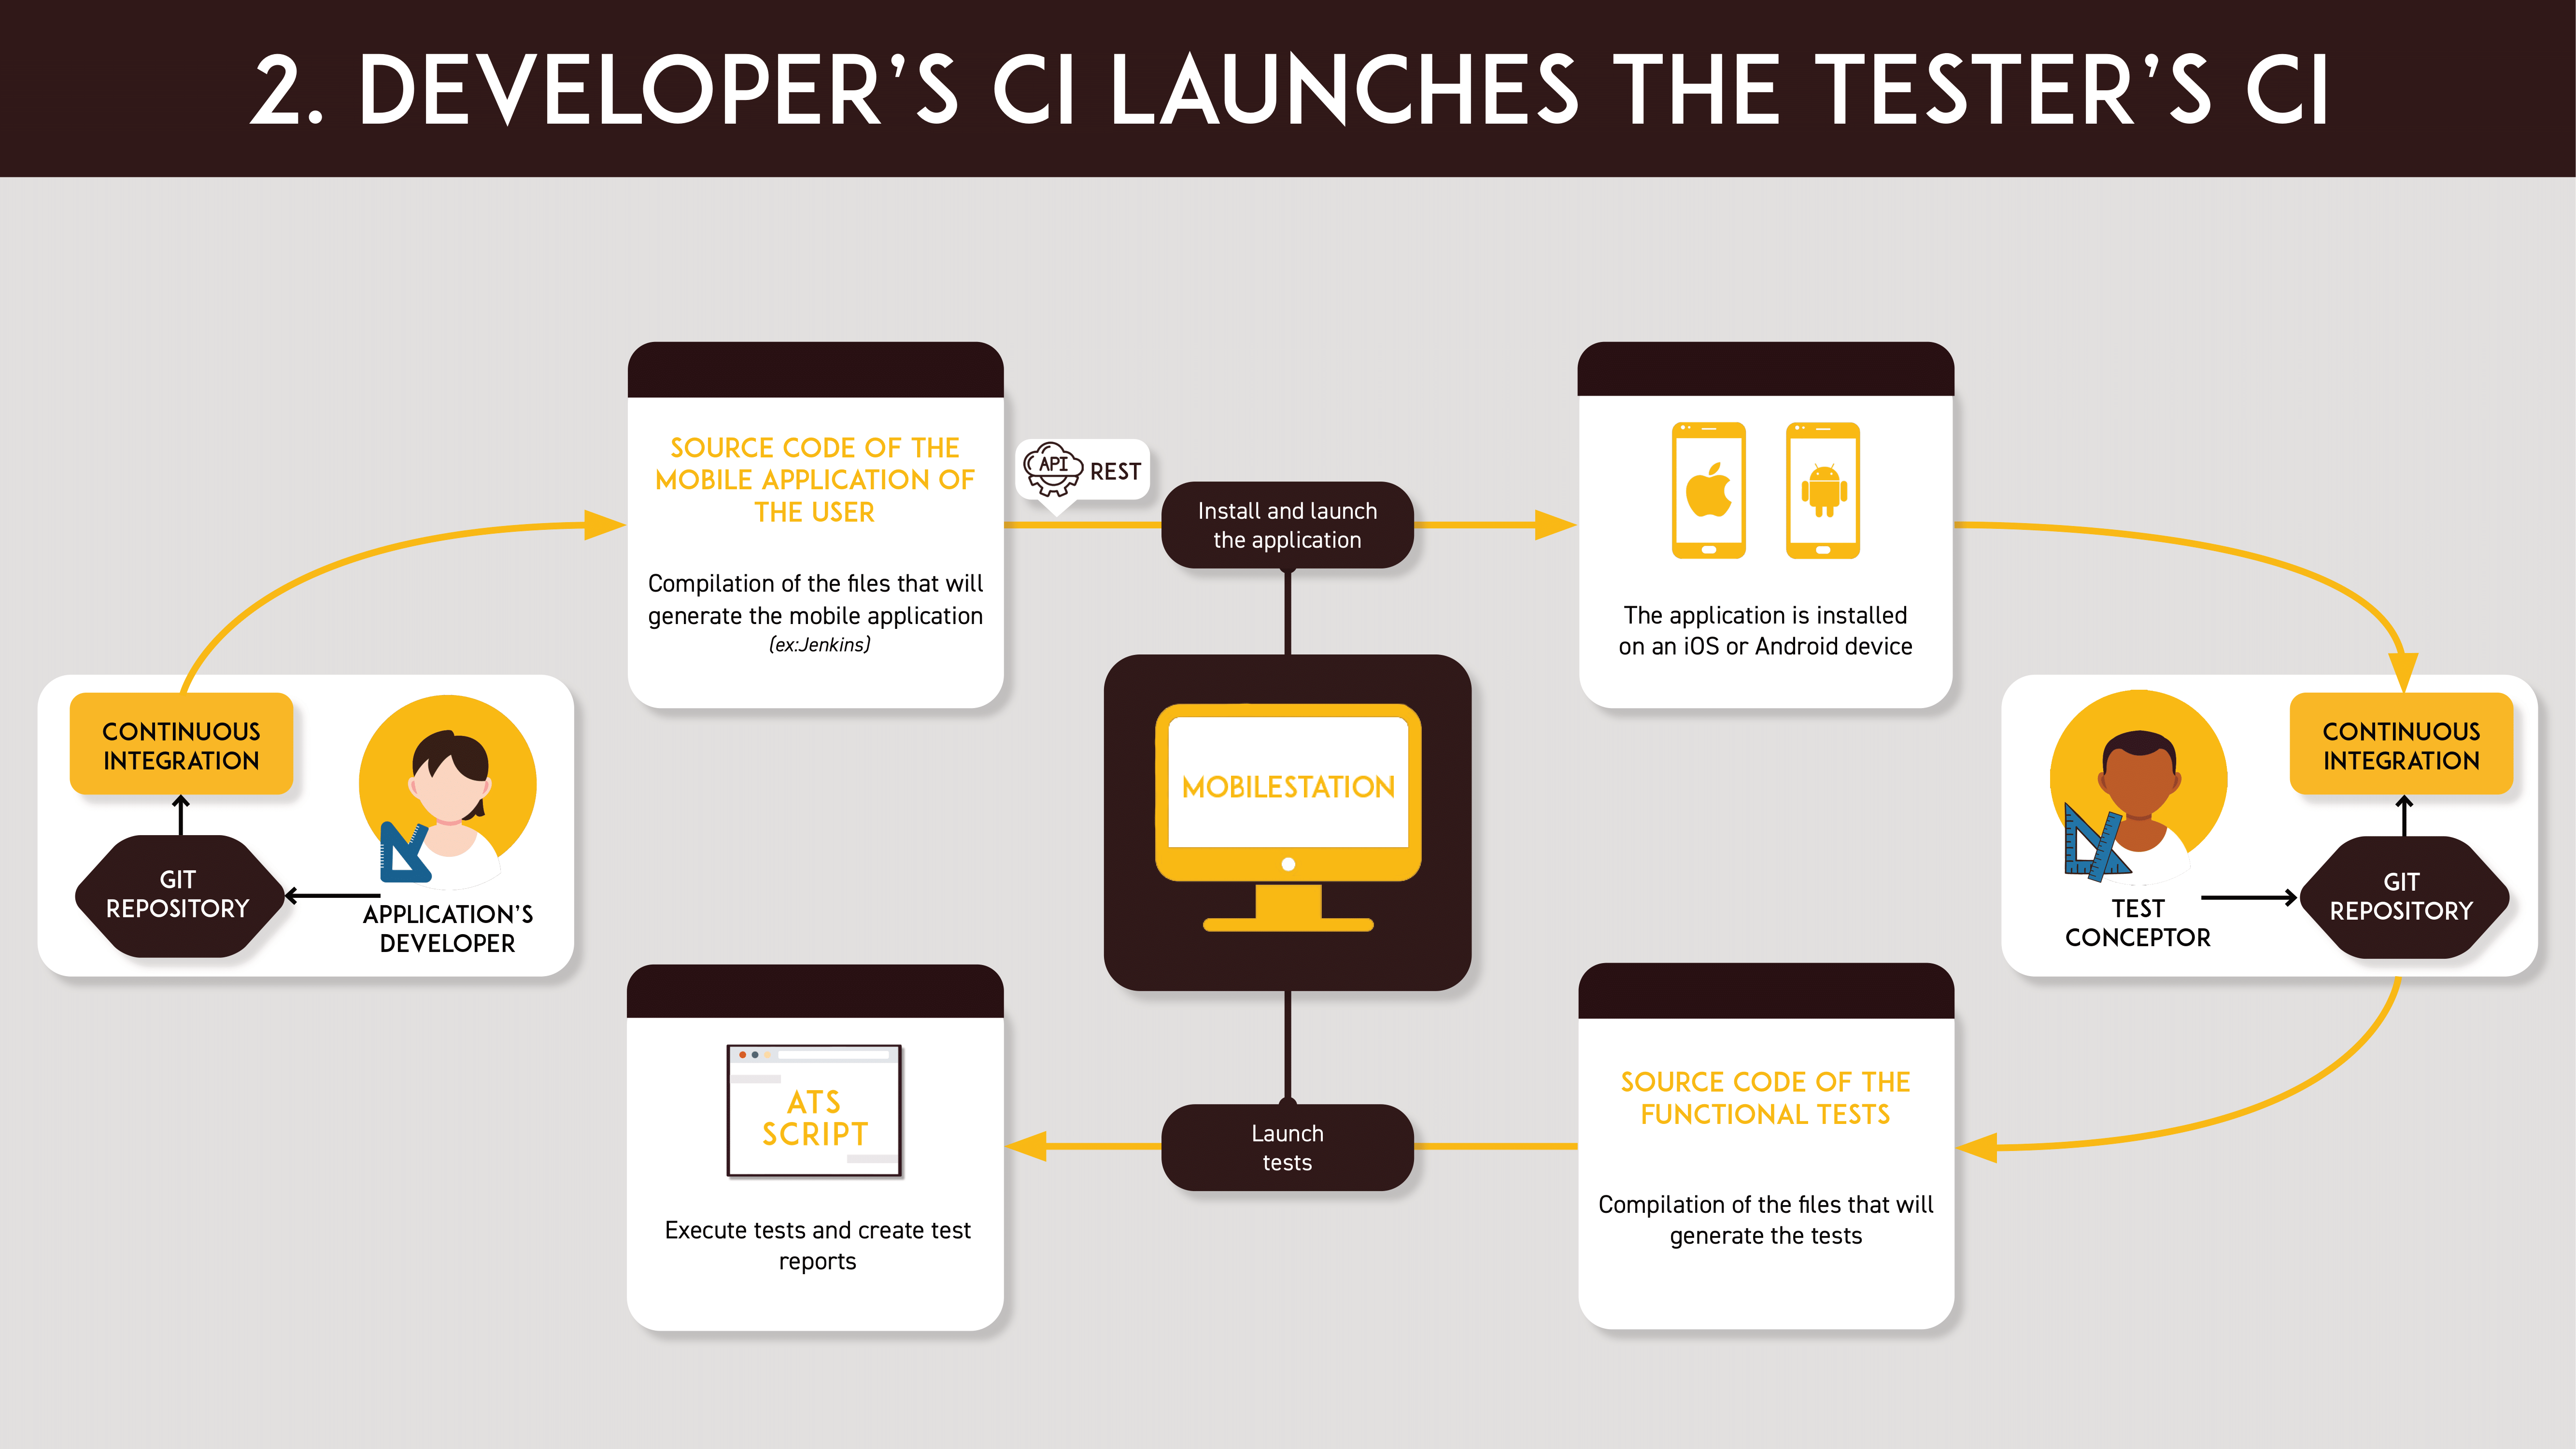
The application developer's continuous integration will generate the application from the source code. Then it will be sent to Mobile Station and installed on the devices. With the intervention of the test developer's continuous integration, the tests will be generated via the source code which will allow the execution of tests from Mobile Station. (Link to the video of the animated scheme: https://youtu.be/5ui7ZPKnOKQ)
3. The application developer and the tester work asynchronously
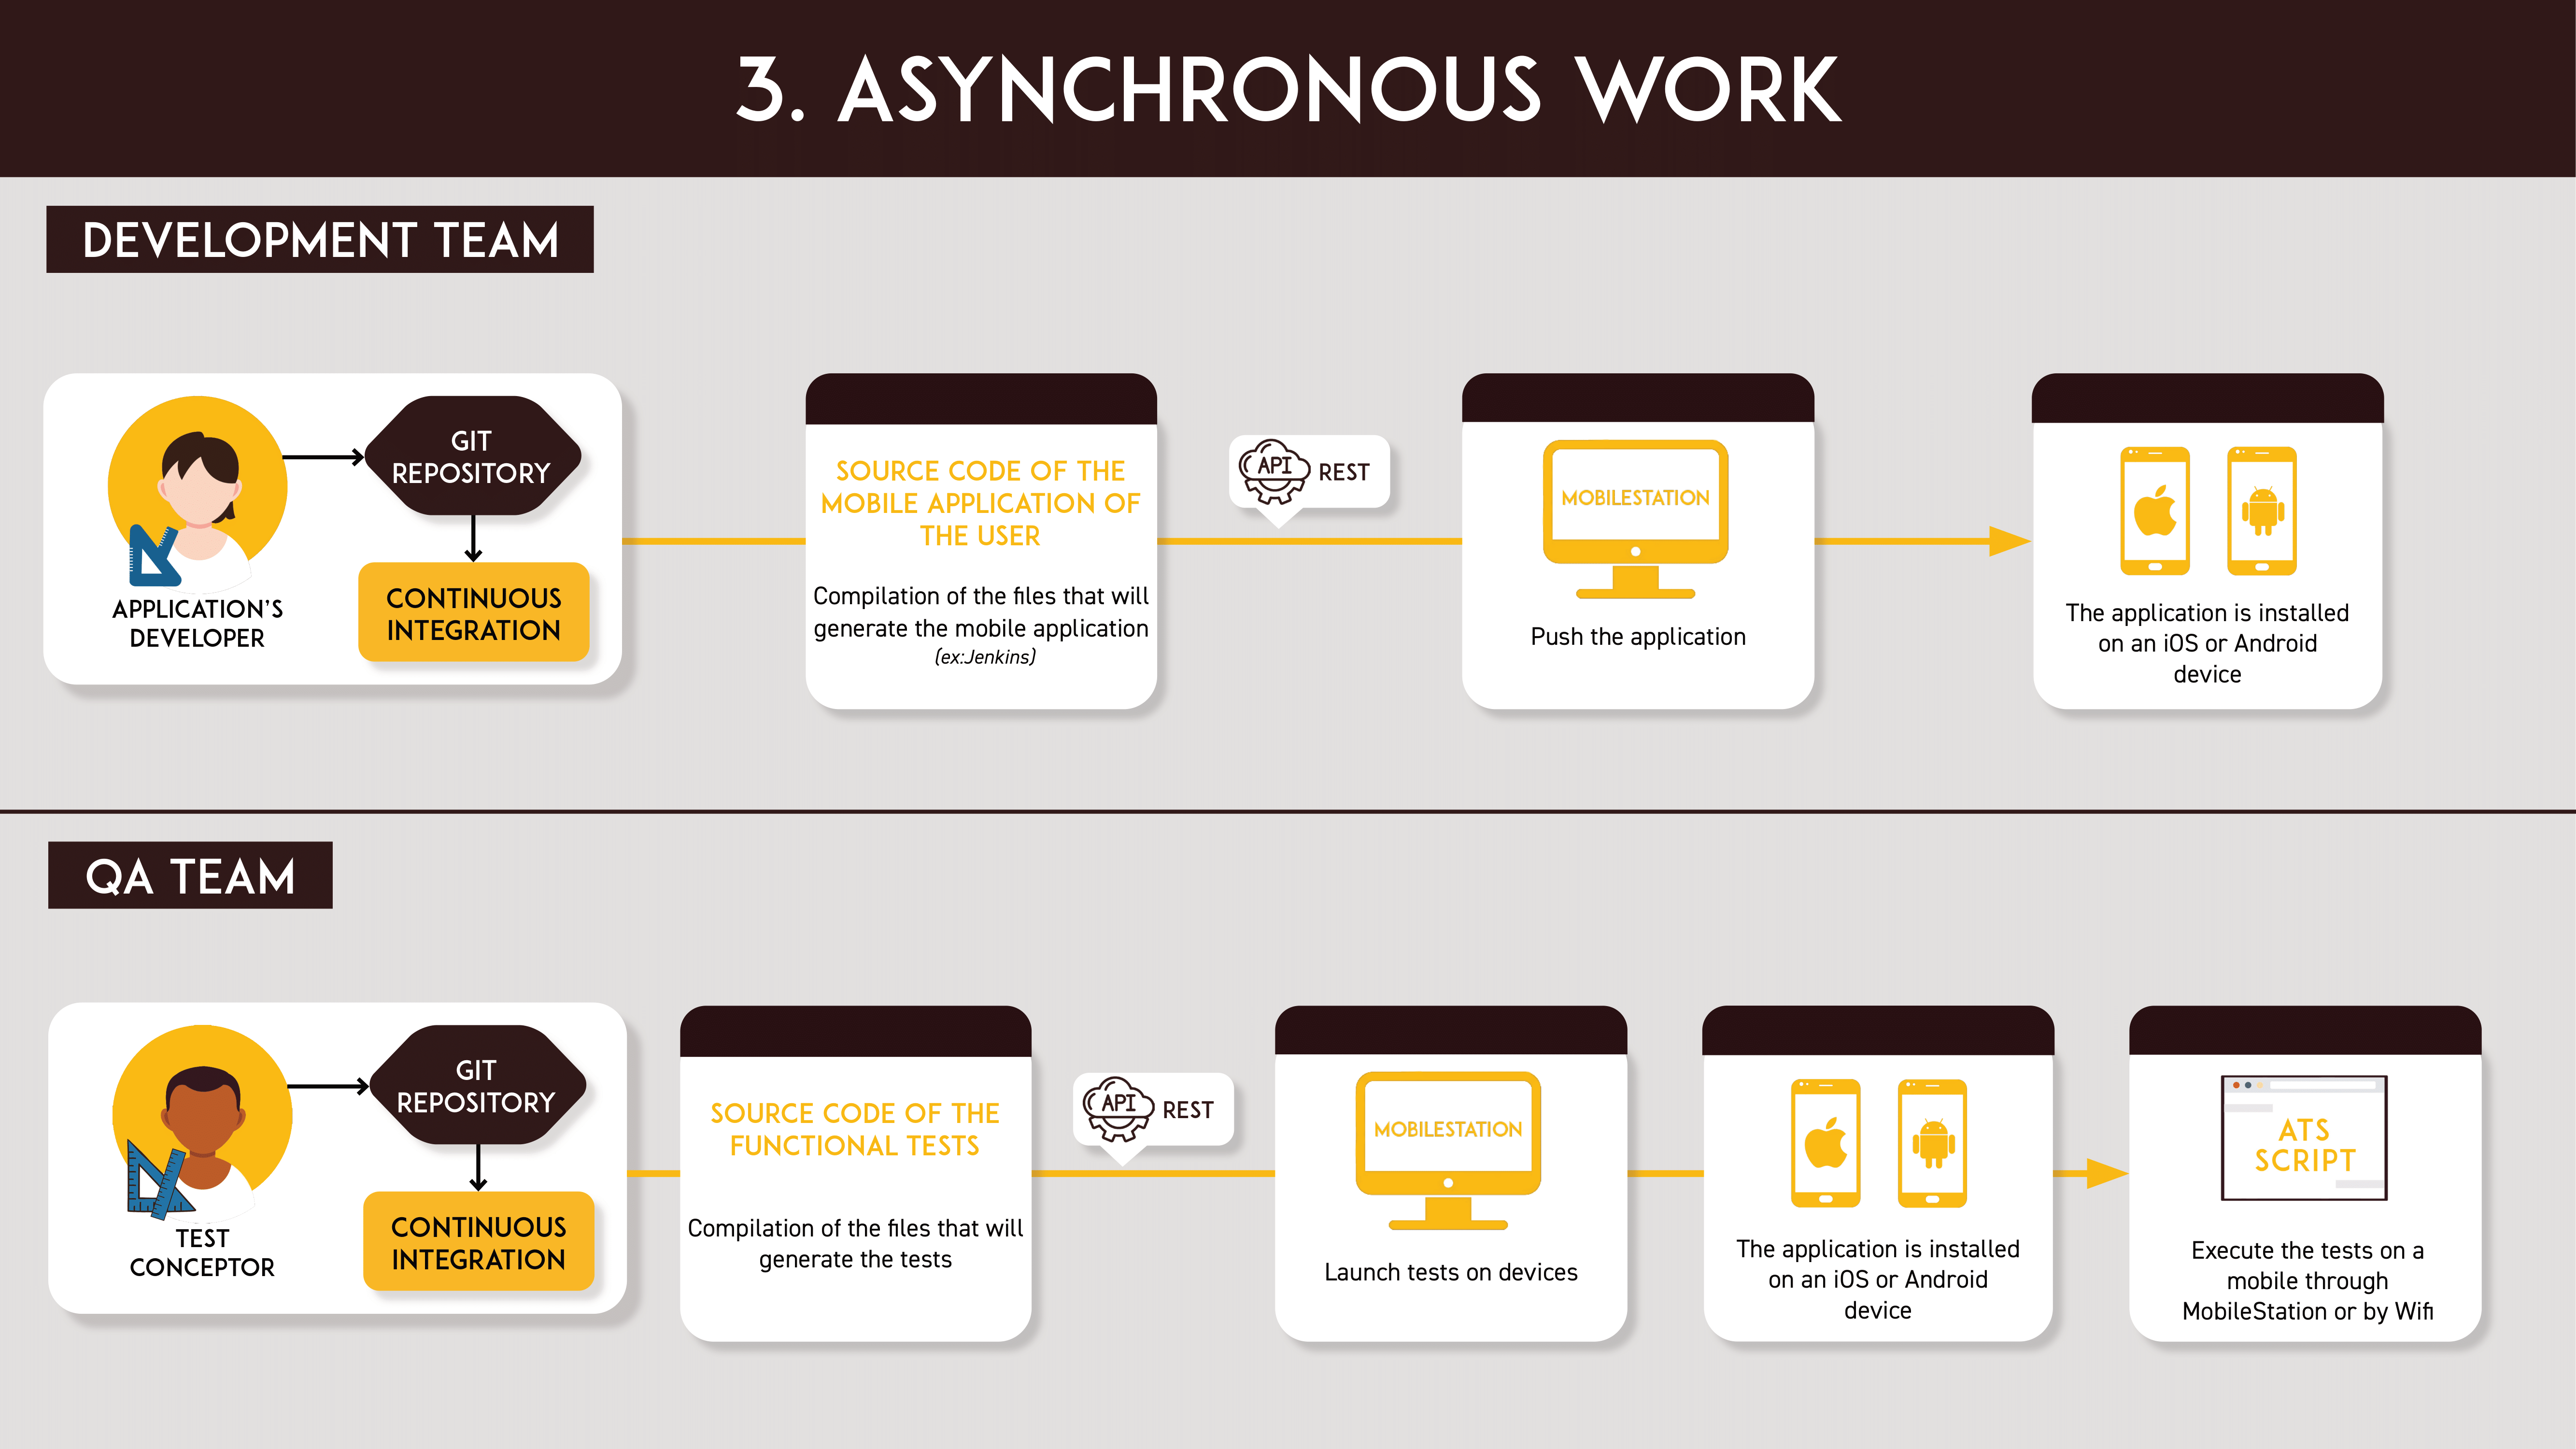
The application developer and the test designer can run their tests asynchronously. With its continuous integration the application developer will install its application on its devices via Mobile Station. With the test designer's continuous integration, the application installed on Mobile Station and its devices can be tested. (Link to the video of the animated scheme: https://youtu.be/CyMW2N2tjiE)


