Tests executions
Designing tests and maintaining test scripts are two essential aspects of the software testing process. The Agilitest editor enables you to build your tests and modify them directly in the interface during execution in "step by step" mode.
A range of functions are available at action level to configure and modify the execution of your tests.
“Step by step” execution mode
The step-by-step mode is a special mode dedicated to editing and modifying tests.
Agilitest lets you replay actions independently of each other, so you can run them step by step.
To do this, click on the play button that appears on the line of each action you hover.

Agilitest will then immediately perform this action on the software being tested and send you the result.
%2520(1).png)
This operating mode allows you to run your test step by step, selecting actions one after the other and checking that each action has been carried out.
Execution options
Marking a stopping point during execution
It is possible to add a breakpoint to an action during test execution, for debugging purposes.
To do this, click on the tick below the action index to display the "Stop" icon.
When you run your test, it will stop at the stop point you specified.
Manage the number of tries for an action
It is possible to increase or decrease the maximum number of attempts. This tells Agilitest that it must try several times to wait for the feedback of the application before generating a failure.
This contributes greatly to the robustness of the tests when you know that your server may be in a situation where it does not deliver the desired page immediately.
The maximum number of attempts is limited to 50, but the waiting time between each attempt follows an exponential curve: this makes it possible to quickly check the conditions for success when they are met, but also to wait "a certain amount of time" for a long processing to be carried out.
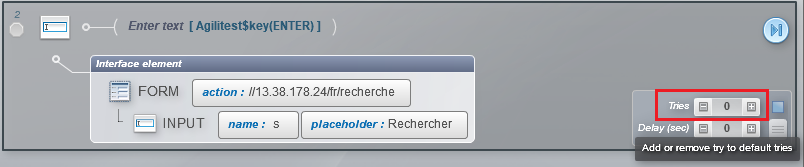
These tests can also be separated by a time interval. The higher the value, the longer Agilitest will wait between tests.

Managing waiting times with Java
Another solution is to use a Java code piece, here's how:
In the Agilitest explorer, select the view to “Java ATS scripts”
.png)
Click on the button to “Create a Java ATS script”.
.png)
You can also create a Java script by clicking on “New component”, at the top left of the editor.
.png)
Enter the name of the script you want to use as a standby function
The editor opens a java code editing window. Paste the following code into the testMain function () :
try { final int ms = Integer.parseInt(prm(0, "1000")); Thread.sleep(ms);} catch (Exception e) {}
Finally, drag and drop the Java script from the Agilitest explorer to the script where you want to call it in your test.
💡 Tip
If you want to be able to specify the waiting time directly from your ATS script in Agilitest, you can declare a parameter passed by value to the script and then use the following code:
try { final int ms = getParameter(0).toInt(); Thread.sleep(ms);} catch (Exception e) {}
To indicate that an action may fail
Action without a functional status
Actions without functional status are actions like “Commentary”, “Go to URL”, “Start channel”, etc…
Those actions can not functionally fail. They can only fail if there is a test conception error.
Examples of conception error : a missing subscript, a missing file, a technical error…
Actions with a functional status
- Blocking action
.png)
By default, actions in the script are blocking the test during an execution.
If the action fail, the test stops and will be considered as failed.
- Non blocking actions
- Optional action
.png)
By specifying that the action is optional, if the action fails, the test will not stop and the test status will not be changed.
-
- Non blocking action with fail status
.png)
By specifying that an action is non-blocking, if the action fails, the test will continue to be executed, but its status will be definitely failed.
To indicate this behavior in Agilitest, press the CTRL key on your keyboard and then click on the green arrows.
Execution in reduced mode
If you wish, you can run your test in reduced mode, which will temporarily close the Agilitest window for the duration of the test.
Click on the parameters in the channel management tab below the project explorer,
.png)
Then tick the “Execute in reduced mode” box.
.png)
The Agilitest editor will be scaled down to give you a better view of what's going on in your application, which can be useful if you only have one screen.
.png)
Execute in Java mode
ATS has been designed to generate Java code to execute compiled tests, which is particularly well suited to launching continuous integration tests, or running complete test campaigns in Agilitest.
Execution in Java mode is fast and efficient. Unlike execution in step-by-step mode, which allows you to build and modify your script, execution in Java mode allows you to execute end-to-end in a production environment.
There are three ways of running tests in Java mode:
- Directly from the script
Instead of running your script step by step from the Agilitest editor, you can choose to run the test in Java mode.
To do this, right-click on the script in your project explorer. and select “Java execution”
.png)
This will compile your script and open a Java execution window
.png)
2. Create an execution suite
It is possible to create execution suites. These suites group together a set of scripts that will be compiled and executed with Java.
To do this, open your project menu then click on "Execution management" to open the Project builder.
.png)
From this page, you can create suites in the "Executions" area.
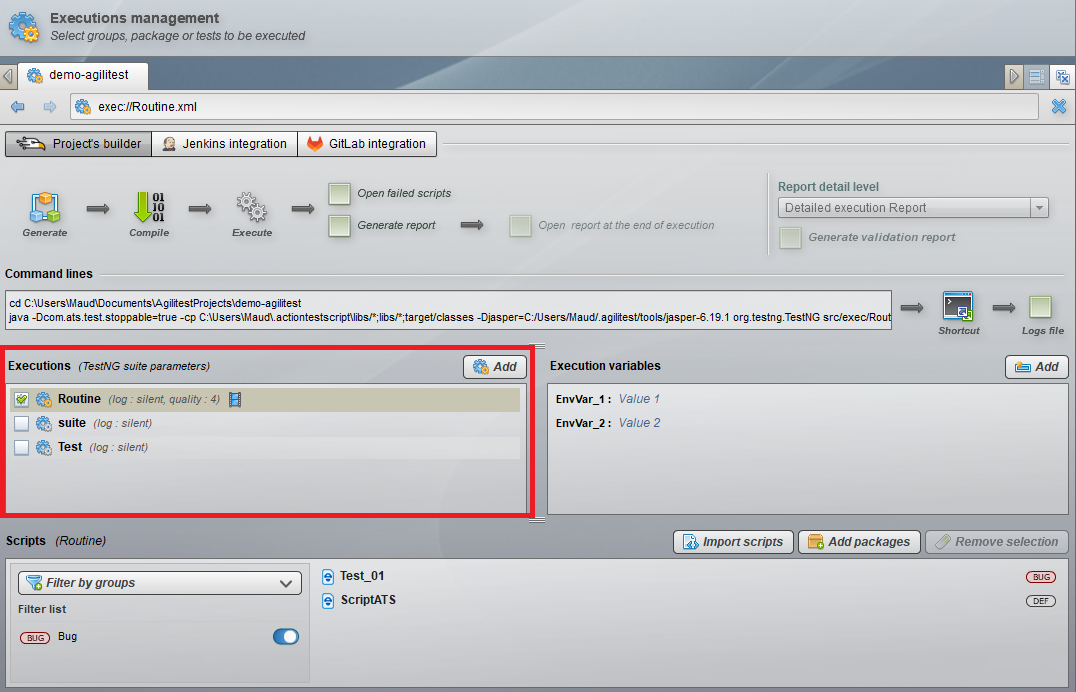
Once you have created your suite, click on "Generate" → "Compile" → "Execute" to execute your script in Java mode.

This will open the Java Terminal window
3. Java execution outside Agilitest
You can enter the command line in your terminal to execute the code without using Agilitest.
To retrieve the command line, copy the command line from the project’s builder,
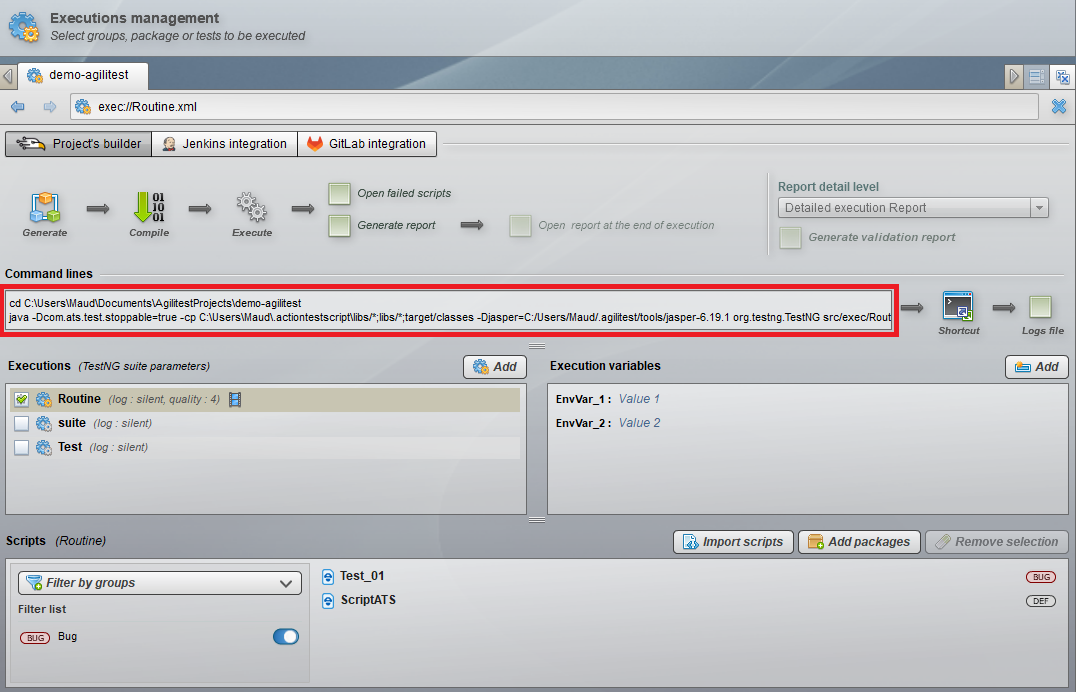
Then copy the command line into your terminal on your computer to execute it without using Agilitest.
Element not found
In test automation, it can happen that an element is no longer recognized during execution due to changes made to the software.
To remedy this, Agilitest lets you adjust tests directly in the editor.
Location and analysis
You can use the video of the failed test execution and/or a report with screenshots to understand and locate the recognition failure. There are two possibilities:
- The item originally searched for no longer exists in the software under test.
- The element initially searched for exists but is no longer recognized.
Correct the test
- If the required element no longer exists
The test can be modified by deleting this action in the editor.
To do this, right-click and select "Delete".
%2520(1).png)
Check the previous and following actions that may be related to test execution, if necessary.
2. If the element you are looking for exists, but is no longer recognized
The test must therefore be modified, in particular by updating the recognition criteria for this element in the Agilitest editor.
To do this, Agilitest indicates precisely which attribute is not found to locate this element.
%2520(1).png)
Open the capture tool from the editor,
.png)
Capture the element by pressing the CTRL key while hovering your mouse on the element,
.png)
Adjust detection attributes.
It's possible to use a "regular expression" on each attribute for robustness.
Remember to validate detection uniqueness using the built-in statistical test.
.png)
Drag and drop these new attributes onto the action concerned by this "non-detection" to update it.
.png)
Save your modifications.
Custom waits
The problem of action verification
“Custom waits” are a function used in a peculiar context to wait that certains things are done before the execution of an action.
There are some things that ATS or Agilitest can't handle in terms of checking test execution continuity.
When an action is executed, there is a lot of processing before the action is passed (checking whether the element is clickable or not, checking whether the element is moving, etc.). Some of these cases cannot be foreseen, as they depend on the application and its specific development.
One solution would be to add a control or wait ATS action before each action, which would thicken your scripts.
The other solution is to add a "custom waits" file as a Java library to an ATS project.
This mecanism enables background processings to be carried out systematically for each execution of the project
A template of this library that you can modifiy is provided by Agilitest, along with its source code
Parameter your library
Download the source code with this link:
https://agilitest.app/resources/tools/AtsWaitGui.zip
To parameter your library, open the file and import a project.
Click on “Existing Maven projects” and select the Agilitest Custom Waits project
.png)
In this library, you can add a class in which you can overload some processing methods before your actions.
.png)
This is a class that inherits of an existing ATS class that will overload at some specific times of the execution of ATS tests
Example:
.png)
- An action is done before the search of an element
- An action is done before a mouse click on a found element
- An action is done before changing a window/tab
- An action is done before an enter text action
- An action is done before a go to URL action
To compile and package your file, open a console and enter “mvn clean package”
.png)
Once it is done, you can retrieve the .jar library in the target repository of your project.
.png)
Cette librairie .jar doit être mis dans votre répertoire de librairie Java du projet Agilitest
.png)
Once the library has been placed in your Java library directory, the added overloads will be systematically executed before each action when your scripts are executed.
