Configuring ATS
When using Agilitest for the first time or during its use, you can configure the software to optimize its use. Agilitest works mainly with the ATS and Java (JDK) packages that will be used to create, maintain and execute automated projects.
At the top right of the editor there are various support menus including the "Settings" menu.
.png)
Click on the “Settings” button to open the window in the editor
.png)
Agilitest settings
Error reporting
You can enable error reports (or logs) by checking the "Error reporting" box.
.png)
Three log options are available:
- The Startup logs, in case Agilitest crashes at launch
Then the test execution logs which will display technical errors (related to a driver, not functional errors):
- To open the current logs, empty by default, which display the last created logs
- To open the logs directory in your Windows explorer and have access to the logs history
Languages
In this configuration menu, you can also change the language to English or French.
.png)
Mandatory tools
There are two prerequisites for the proper functioning of Agilitest: the ATS package and the JDK.
ATS settings
Agilitest requires an up-to-date ATS library to operate.
.png)
From these configurations you can :
- Create a configuration: This will create a global configuration of ATS in the system. By clicking on it you can modify the configuration.
- Download ATS components
- Download ATS-OpenCv
- Create a Neoload configuration
- Open a Maven directory
- Open an ATS directory
How to set up ATS?
It is also possible to configure some of the functions of the Agilitest editor via the .atsProperties configuration file.
To access the ATS properties, click on the "edit configuration" button of the ATS settings
%20(1).png)
The currently allowed parameters are as follows:
- Default number of executions of each action in the editor before deciding on a failure. By default they are set to 10.
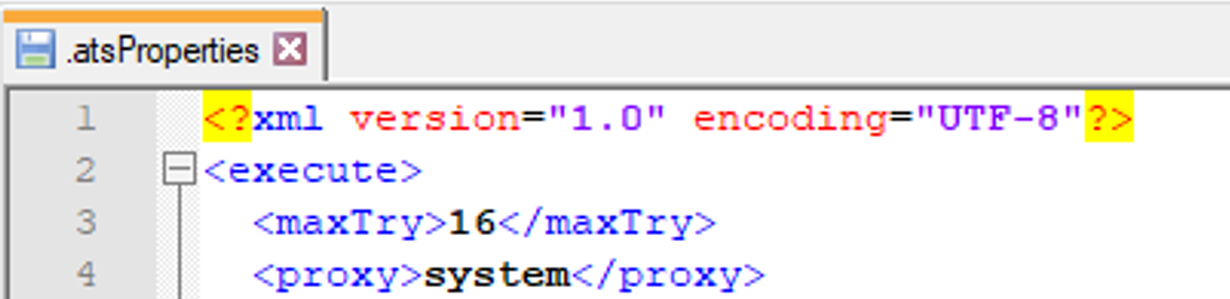
- Positioning of windows opened automatically by the editor. By default, the coordinates of the upper left corner are set to x=20 and y=20.
- Sizing of the windows opened automatically by the editor: width and height set by default to 1500 x 960
.png)
- Management of the "timeOut” on the execution of the scripts and the loading of the web pages. By default, it is set to 60ms and 120ms
%20(2).png)
- Management of access paths to different browsers and specific waiting times for each of them:

- Management of access paths to the various Windows desktop applications installed on the computer. A shortcut will be automatically created from the "Applications" menu in the startup action of a channel.
.png)
You will find the application registered in the properties directly in the applications when you open a channel

🔸 Warning
The access paths will have to be adapted according to your configuration.
Java (JDK) settings
Java allows to load, compile and execute ATS projects.
From the configuration menu it is possible to download the JDK or to enter the path to a JDK already existing in your computer.
.png)
🔸 Warning
You need at least a version 11 of the JDK for Agilitest to work.
It is also possible from this interface to add Java execution arguments for the launch of tests by clicking on the "Add argument" button.
.png)
External connections
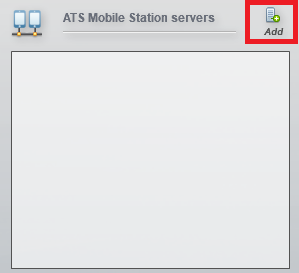
ATS Mobile Station servers
It is possible to set up an ATS Mobile Station server to automatically connect the set up server during your mobile tests.
By clicking "Add" button, you will be asked to enter the IP address and port, which will be retrieved directly from Mobile Station interface.
You can check our documentation on mobiles tests.
GIT accounts
The Git account in Agilitest allows you to clone an existing Git account and thus use a Git project.
Click on the “Add” button to add an account
.png)
Then, enter your Git account information.
.png)
