Why AI-Driven Automation demands an interactive loop ?
Modern AI models can generate code… but they cannot see your application.
Most AI-generated test scripts still:
• guess selectors,
• hallucinate element paths,
• produce fragile automation,
• require manual correction.
That’s because typical approaches rely on static code generation without runtime feedback.
Agilitest introduces a different approach.
Instead of generating blind scripts, the AI interacts with the application through an interactive execution loop.
This mechanism is widely known in computer science as a REPL (Read–Eval–Print Loop).
In Agilitest, we call it the AI Interactive Loop.
It allows the AI to observe the application, validate actions, and build reliable tests step by step.
With the AI Interactive Loop, the AI:
✅Explores the application through a machine-friendly protocol,
✅Receives structured feedback about actual elements,
✅Validates intent before recording actions,
✅Builds functional tests reliably.
The AI no longer guesses.It observes, evaluates, and then acts.
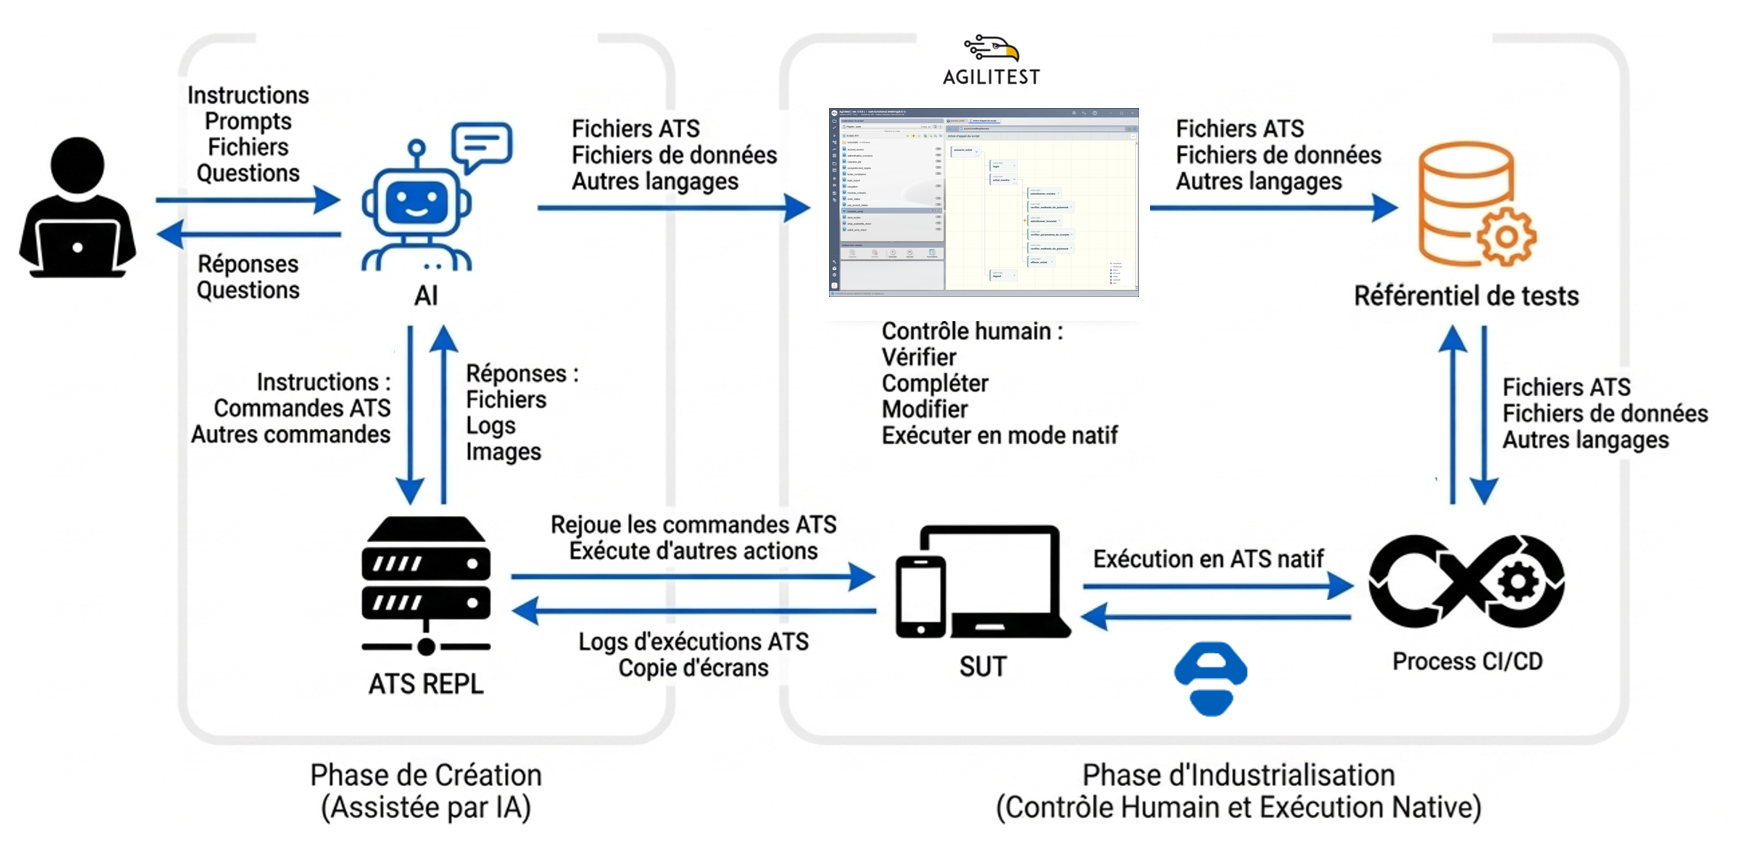
What the Agilitest ATS-REPL Is
The REPL is a lightweight HTTP server that exposes an interface between your application and an AI agent.
Unlike a developer console, it is machine-first:
✅accepts structured commands (
✅returns structured responses (not DOM dumps)
✅differentiates exploration vs. recording
✅logs compactly and consistently
This lets the AI observe before acting.
Unlike a developer console, it is machine-first:
✅accepts structured commands (
find, screenshot, click, keyboard, etc.)✅returns structured responses (not DOM dumps)
✅differentiates exploration vs. recording
✅logs compactly and consistently
This lets the AI observe before acting.
How It Works – In Practice
Step 1 — Launch the REPL Server
Start an AI agent based on the root of your ATS projet starts a REPL on a local port. (e.g., Claude, GPT) connects and begins a session.
The memory.md contains allrequired information for the agent to be informed of how the REPL server works
This session lasts for one scenario and can be torn down after.
Step 2 — Exploration Commands
The AI uses the REPL exploration commands to inspect the page (ATS commands, screenshots) and gets feedback
Key point:
Exploration responses are structured, not guessed.
AI sees real element metadata.
Step 3 — Validate Before Recording
Once an element is found, the AI doesn’t immediately record a step.
Instead it uses the REPL to:
✅verify the element exists
✅confirm correctness
✅choose the most stable action
✅verify that this action insures the functionnal consistency of the test
✅plays the action before going on
Only after this validation is the step saved into a functional ATS script.
This eliminates:
• blind code generation
• brittle selectors
• unstable tests
Step 4 — Interactive Feedback
During all that time, the AI hase given to the user a real-Time Feedback : Summarize detected elements, explain decisions, confirm assumptions, ask for clarification, display validation results
This makes the process collaborative — not opaque : The user always understands what is being created.
Once the scenario is complete, the REPL enables:
✅saving ATS scripts
✅Creating subscripts
✅Generating data files (CSV, JSON)
✅Organizing project structure
✅Files are written directly into the Agilitest project
Step 5 — Open and Control the Project in Agilitest
This is the critical human step.
Once files are generated, the project can be opened directly in Agilitest.
Here, users can:
✔ Verify the generated ATS scripts
✔ Review functional decomposition
✔ Modify steps visually
✔ Adjust selectors if needed
✔ Edit data files
✔ Add new iterations
✔ Refactor subscripts
✔ Run native ATS execution
This is not a black box.
The AI accelerates creation.
The human keeps control.
See Agilitest in action. Schedule a demo
And see the benefits you can unlock from smart test automation.
The tests scenarios can be replayed in ATS, our Open-Source backbone.
For free and forever.
For free and forever.

