Agilitest Installation & Update Guide
Free Access to Agilitest
Not using Agilitest yet?
You can explore the platform with a full-featured 1-month free trial.
Simply install the version available on this page. Upon first launch, a trial license will be automatically issued once a valid email address is provided.
This trial grants access to all Agilitest features, enabling you to evaluate the platform in real-world conditions.
ATS (actiontestscript) is an open source functional langage : any tests you create remain fully usable beyond the evaluation period and can continue to run independently of Agilitest.
If you would like guidance during your evaluation, our team is available at: contact@agilitest.com
1. Overview
install-agilitest.ps1 is the single script that handles installation, update, backup and restore of Agilitest and its ATS components on Windows.
It manages the following components:
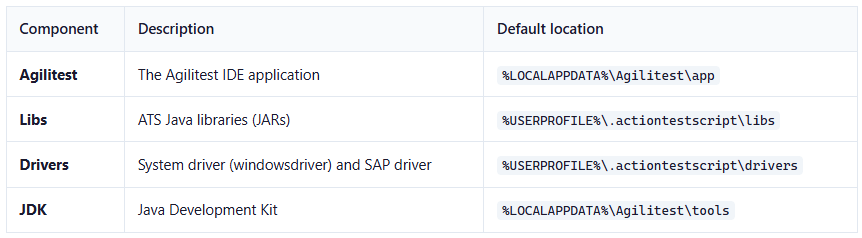
Browser drivers (chromedriver, geckodriver, etc.) are updated automatically when ATS channels start and are not managed by this script.
Before any install or update, the script stops all running Agilitest and ATS processes: agilitest, windowsdriver, sapdriver, browser drivers (chromedriver, geckodriver, msedgedriver, operadriver, bravedriver), ATS workers (awio, awpy, awjs, awsys, awmath, webviewer), and java.exe instances launched by AgilitestEditor.
2. First Installation
Option 1: One-line install (recommended)
Open PowerShell and run:
irm https://agilitest.app/install-agilitest.ps1 | iexThis downloads and runs the installer. It will:
- Detect that Agilitest is not installed
- Ask you to confirm the install directory
- Show an operation plan with all components to install
- Ask for confirmation
- Download and install all components
- Launch Agilitest
Option 2: From the .bat launcher
Double-click update-agilitest.bat in the scripts folder of your Agilitest installation. This runs the PowerShell script with the correct execution policy.
Option 3: From PowerShell directly
.\install-agilitest.ps1If you get an execution policy error, use:
powershell -ExecutionPolicy Bypass -File .\install-agilitest.ps1
3. Updating
Run the same script again. It automatically:
- Stops all running Agilitest and ATS processes
- Detects your existing installation directory
- Checks local and remote versions for each component
- Displays an operation plan showing what will be installed, updated, or skipped
- Asks for confirmation before proceeding
- Creates a backup of current versions (skipped if nothing changed)
- Downloads and installs only what needs updating
- Relaunches Agilitest
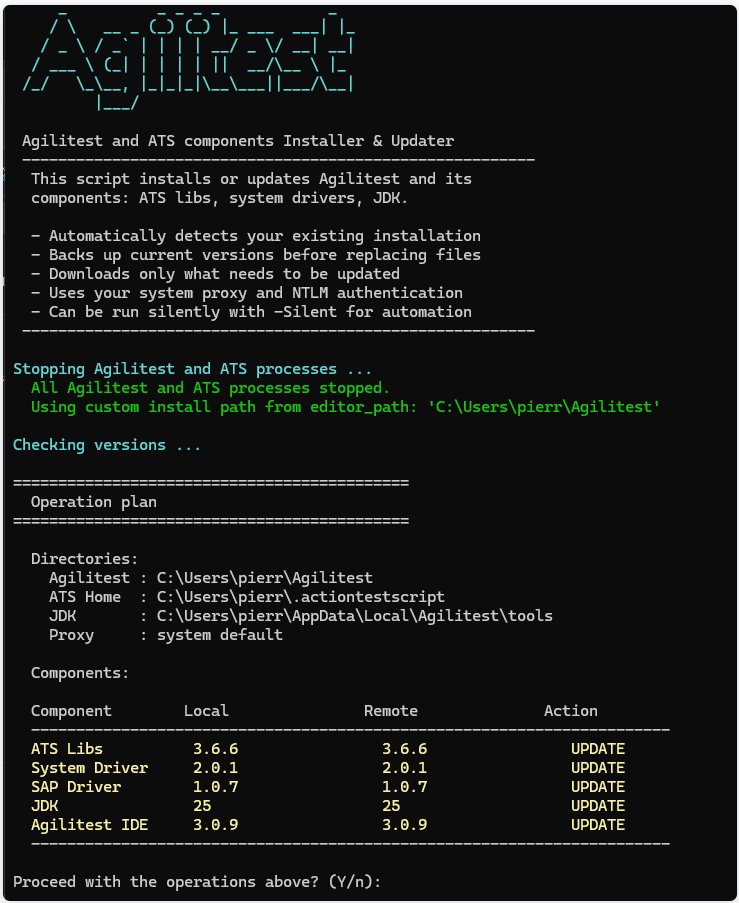
Operation plan
Before any download or file modification, the script displays a recap table with directories, component versions, and planned actions:
- Update mode — components with pending updates are highlighted
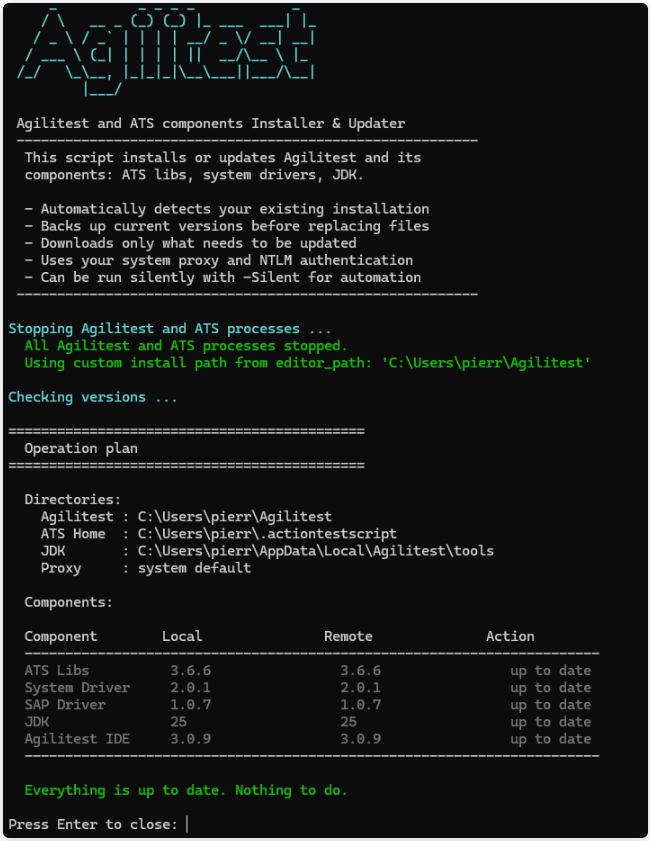
- When everything is already up to date, no action is taken
You must confirm with Y (or press Enter) to proceed. In -Silent mode, confirmation is skipped.
Update a single component
.\install-agilitest.ps1 -Component Libs.\install-agilitest.ps1 -Component Drivers.\install-agilitest.ps1 -Component Jdk.\install-agilitest.ps1 -Component Agilitest
Force update (even if up to date)
.\install-agilitest.ps1 -Force.\install-agilitest.ps1 -Component Libs -Force
4. Silent Mode
For automation and CI/CD, use -Silent to suppress all interactive prompts:
.\install-agilitest.ps1 -SilentCombine with -LogFile to keep a trace:
.\install-agilitest.ps1 -Silent -LogFile C:\temp\agilitest-install.log
5. Backup
Before every update, the script automatically backs up the current versions to:

- Backups are skipped if nothing changed since the last one. The script computes a SHA1 fingerprint from file names and sizes, and compares it to the most recent backup's fingerprint.
- Only the 5 most recent backups are kept, older ones are automatically purged.
- The backup path is shown in the installation summary at the end.
6. Restore
To restore a previous backup:
Option 1: From the .bat launcher
Double-click restore-agilitest.bat in the scripts folder of your Agilitest installation.
Option 2: Command line
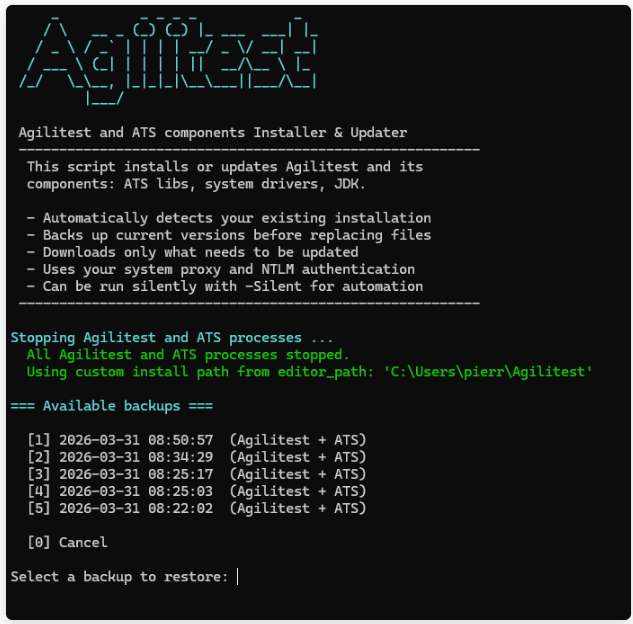
.\install-agilitest.ps1 -RestoreThe script displays a numbered list of available backups with their date and content. Select the one to restore and it will replace ATS libs, ATS drivers, and Agilitest IDE files with the backed-up versions.
- Restore mode — select a backup to restore from the numbered list
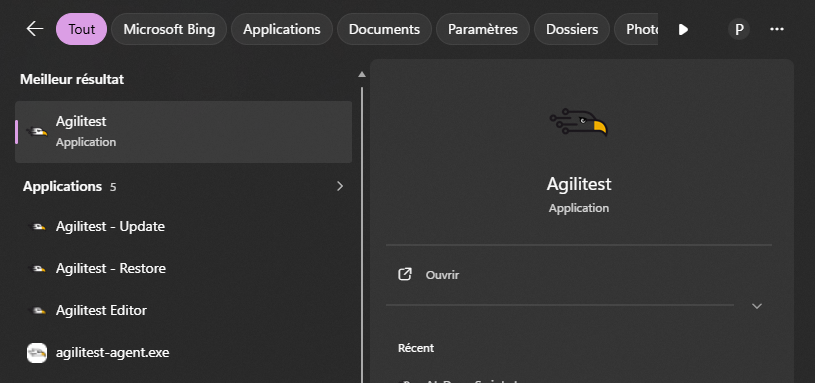
7. Start Menu Integration
After installation, the script creates Start Menu shortcuts so you can find Agilitest from the Windows search bar (Win key):
- Agilitest — launches the IDE
- Agilitest - Update — runs the update script
- Agilitest - Restore — runs the restore script
Just press the Windows key, type "agilitest", and all entries appear:
The shortcuts point to .bat launchers located in the scripts subdirectory of the install folder:

8. Proxy & Enterprise Networks
The script uses the system proxy configuration (same as Chrome/Edge) and supports NTLM authentication out of the box. No extra configuration is needed in most enterprise environments.
To override the proxy:
.\install-agilitest.ps1 -Proxy http://proxy.company.com:8080
9. Custom Install Directory
The install directory is resolved in this order:
%USERPROFILE%\.agilitest\editor_pathfile (written by Agilitest at startup)- Directory containing the script (if
agilitest.exeis present) - Subdirectory next to the script containing
agilitest.exe - Search in
%USERPROFILE%(depth 2) - Search in
%LOCALAPPDATA%(depth 2) - Default:
%LOCALAPPDATA%\Agilitest\app(new install)
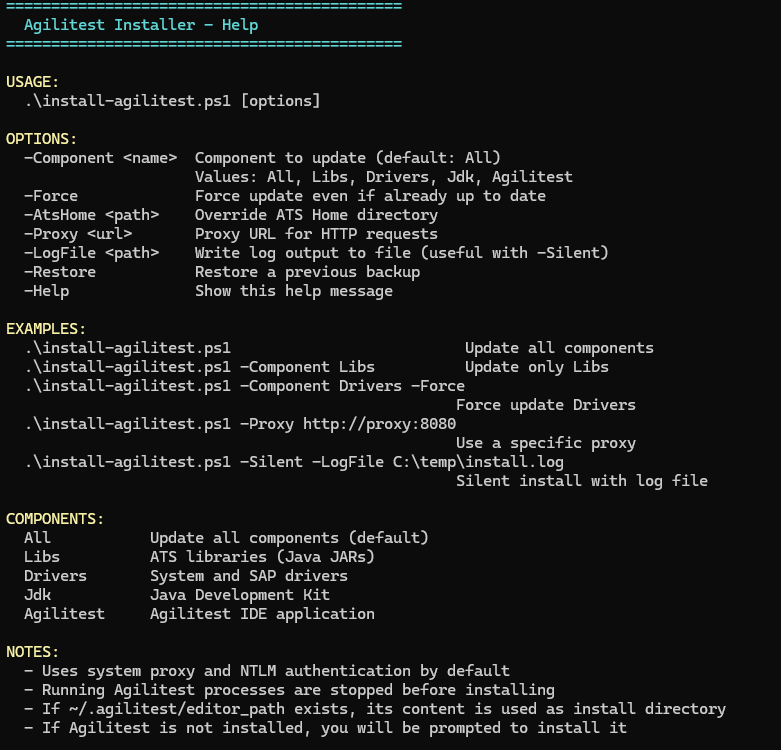
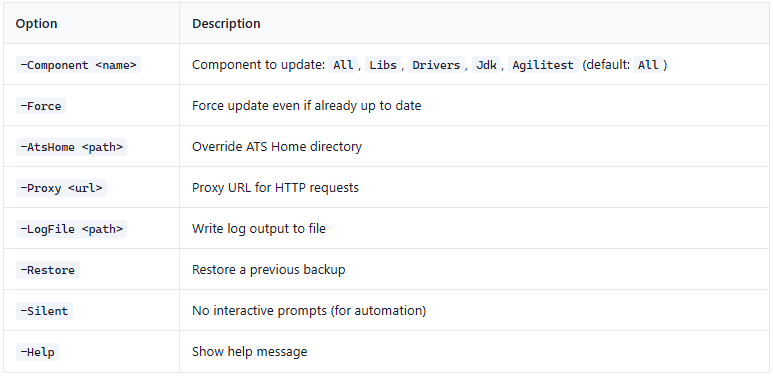
10. All Options
11. Troubleshooting
Script is blocked by execution policy
Use a .bat launcher (see above) or run with:
powershell -ExecutionPolicy Bypass -File .\install-agilitest.ps1
Download fails behind a corporate proxy
Try specifying the proxy explicitly:
.\install-agilitest.ps1 -Proxy http://proxy:8080
Need to see what happened during a silent install
Use the -LogFile parameter:
.\install-agilitest.ps1 -Silent -LogFile C:\temp\install.log
Agilitest was installed in a wrong nested directory
The script auto-detects and fixes recursive paths (e.g. Agilitest\Agilitest\Agilitest). Just run the installer and it will correct the editor_path file and clean up the duplicate folders.
